Intro to Premiere Pro - PP
Contents
[hide]Intro to the Intro
Welcome to Premiere Pro. It follows the basic design of most editing software: a Project window where you can view all of the assets you have brought into a project, a Source window where you can view assets and set in and out points before bringing them into a Sequence. A Program window where you see the video that has been placed into a Sequence, and of course a Timeline window, where you will actually do most of your editing. You can have multiple Sequences in one Timeline window.
A unique feature of Premiere is the Media Browser window, which gives you Finder like access to your media, allowing you to easily preview and import media from any source. Premiere recognizes the file structure for most file-based camera systems, makes it even easier to view and import your files.
File Organization
It is super important to organize your media and project files. This cannot be stressed enough. Misplaced files will slow you down when you most need to work quickly. Misplaced files will devour countless hours of your life. It is really pretty easy to keep everything organized if you follow these simple steps
Before you even think of opening Premiere
(These steps apply the first time you start a project. For returning to a project, see below)
- Create a folder in Storage on your computer. Name it something you will remember. Do not use special characters other than dash or underscore.
- Create 4 (or more) subfolders for your media files, and for Premiere's needs. Label them: Video, Audio, Stills, and Premiere_Foo
- Move ALL of your media from flash cards, other servers, cameras, recorders, whatever, into the appropriate folder, i.e., move all of your video files into the "Video" folder, audio & music files into the "Audio" folder, etc. Don't worry about Premiere_Foo just yet.
- After you have consolidated all of your files in to these folders, you should now disconnect or eject all servers & memory cards. This will prevent you from inadvertently trying to work directly from a troublesome source.
When you are done editing for the day
- Save & Quit Premiere Pro
- Connect to your share on Orca (or any other designated server)
- In the Finder, find your project folder in Storage
- Move your project folder to your server storage share
- Et voilá! Your project folder is now safely stored and ready to use on your next editing session.
To work with an existing project
Once you have created a project, stored all of your assets in a folder and then stored that folder on a network share, the next time you want to use that project is easy-peasy.
- Connect to your network share (Orca, Nimrod, etc)
- Drag your project folder to the Storage drive on your local computer
- Disconnect from the network share once the transfer is complete
- Double click on your project file
- Rinse & repeat!
Interface
Windows are called panels in Premiere. Under the Windows menu you can open various panels. Many windows have a Panel Menu in the top right corner which can be used to change settings for that window. ![]()
Any panel can be expanded to full screen by pressing the ` (tilde) key while the mouse is over that panel. Press the ` key again to return to normal.
Media Browser
The Media Browser makes it easy to browse to files, and to find them by their type. Unlike the Import dialog box, the Media Browser can be left open, and docked, like any other panel. The Media Browser gives you quick access to all your assets while you edit. Also, you can use the Media Browser to import clips copied from video storage media such as P2 cards, SxS cards, XDCAM disks, and DVDs. When you import an asset Premiere Pro leaves it in its current location, and creates a clip in the Project panel that points to it.
Always transfer files from their file-based media to a local hard disk. Then, import them into Premiere Pro projects from the hard disk.
Project
The Project panel lists detailed information about each asset in your project. You can view and sort assets in either List view or Icon view. List view displays additional information about each asset. You can customize the information it displays to meet the needs of your project. In Icon view, you can use the Hover Scrub feature to preview footage without having to open it into a new window.
Info
The Info panel displays several data about a selected item, and timecode information for clips under the current-time indicator in the Timeline.
Timeline
You specify the settings for each sequence, trim your clips, and assemble clips in sequences.
You assemble and rearrange sequences in one or more Timeline panels, where their clips, transitions, and effects are represented graphically. You can open a particular sequence on a tab in a Timeline panel among other sequences, or keep it by itself in its own dedicated Timeline panel.
Tools
This panel is for selecting which tool to use in the Timeline. The mouse pointer will change shape when it is over the Timeline. Tools can also be change with keyboard shortcuts.
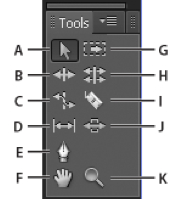
B. Ripple Edit tool
C. Rate Stretch tool
D. Slip tool
E. Pen tool
F. Hand tool
G. Track Select tool
H. Rolling Edit tool
I. Razor tool
J. Slide tool
K. Zoom tool
Source
The Source Monitor plays back individual clips. In the Source Monitor, you prepare clips that you want to add to a sequence. You set In points and Out points, and specify the clip’s source tracks (audio or video). You can also insert clip markers and add clips to a sequence in a Timeline panel.
Program
The Program Monitor plays back the sequence of clips that you are assembling. It’s your view of the active sequence in a Timeline panel. You can set sequence markers and specify sequence In points and Out points. Sequence In points and Out points define where frames are added or removed from the sequence.
Starting A New Project
General
- Video Display Format: Timecode
- Audio Display Format: Milliseconds
- Capture: This setting is only applies if you are capturing from DV or HDV tape. When using file based video this can be ignored.
Scratch Disks
Here is where we get to use the "Premiere_Foo" folder that we created earlier! Foo!
- Captured Video should get set to the "Video" folder inside your project folder.
- Captured Audio should get set to the "Audio" folder inside your project folder.
- Video Previews should be set to "Premiere_Foo". You do not need to know anything about these files. Putting them in "Premiere_Foo" just keeps them organized out of your way.
- Audio Previews should also be set to "Premiere_Foo".
Location
- Click the Browse button.
- Navigate to the project folder you created earlier.
- Give your project an awesome name & hit Okay!
New Sequence Settings
It is easier to import your files into Premiere before creating a new sequence.
- In the New Sequence dialog click cancel.
- Import your video files into the project.
- Pick a file which represents the majority of your files (in terms of dimensions, frame rate, compression etc).
- Select that file in the Project panel. Right click and select New Sequence From Clip.
- A new Sequence will be added to the Project panel and it will open int the Timeline panel.
- Change the sequence name to something meaningful by clicking on the sequence name in the Project panel.