Difference between revisions of "SeaLife DC1400 Underwater Camera Operating Guide"
(→Quick waterproof test) |
(→Use the SeaLife Flash Accessories to enhance color and brightness) |
||
| (36 intermediate revisions by the same user not shown) | |||
| Line 1: | Line 1: | ||
| − | '''THIS CAMERA IS RESTRICTED.''' Proficiency is gained through a workshop. Workshop participants must read this operating guide and bring the written proficiency test answers to the workshop. In addition to reading this operating guide and attending the workshop, it is recommended that you download and read the [http://www.evergreen.edu/medialoan/docs/manual_sealife_dc410.pdf SeaLife DC410 Manual PDF]. | + | '''THIS CAMERA IS RESTRICTED.''' Proficiency is gained through a workshop. Workshop participants must read this operating guide and the [[SeaLife Underwater Light and Flash Operating Guide]] and bring the written [[SeaLife DC1400 Underwater Camera Proficiency Test|proficiency test]] answers to the workshop. In addition to reading this operating guide and attending the workshop, it is recommended that you download and read the [http://www.evergreen.edu/medialoan/docs/manual_sealife_dc410.pdf SeaLife DC410 Manual PDF]. ''You are 100% financially responsible for the equipment you check out from Media Loan.'' |
| + | |||
=== Warnings and Cautions === | === Warnings and Cautions === | ||
==== Warnings ==== | ==== Warnings ==== | ||
| Line 70: | Line 71: | ||
# To exit from the '''Setup''' menu, press the Menu button. | # To exit from the '''Setup''' menu, press the Menu button. | ||
| − | === | + | === Capture Mode === |
==== Capturing Images (Taking Pictures) ==== | ==== Capturing Images (Taking Pictures) ==== | ||
Media Loan's Sealife camera is equipped with a 3” full color LCD monitor to help you compose images, playback recorded images/video clips or adjust menu settings. | Media Loan's Sealife camera is equipped with a 3” full color LCD monitor to help you compose images, playback recorded images/video clips or adjust menu settings. | ||
| Line 178: | Line 179: | ||
## The battery is empty. | ## The battery is empty. | ||
| − | === HD | + | === HD Video Mode === |
==== Recording HD Video Clips ==== | ==== Recording HD Video Clips ==== | ||
This mode allows you to record continuous video with sound in 1280x720 (720p HD), 640x480 (VGA) or 320x240 (QVGA) pixel formats. | This mode allows you to record continuous video with sound in 1280x720 (720p HD), 640x480 (VGA) or 320x240 (QVGA) pixel formats. | ||
# Press the Mode button or '''UW housing Video button''' to select Video mode. | # Press the Mode button or '''UW housing Video button''' to select Video mode. | ||
| − | # | + | # Compose the image. |
# Press the shutter button. | # Press the shutter button. | ||
## The recording of the video clip will start. | ## The recording of the video clip will start. | ||
| Line 199: | Line 200: | ||
## To pause video playback, press the SET (or Shutter) button. This pauses video playback. To cancel pause, press the SET (or Shutter) button again. | ## To pause video playback, press the SET (or Shutter) button. This pauses video playback. To cancel pause, press the SET (or Shutter) button again. | ||
| − | === | + | === Playback Mode === |
==== Playing Back Still Images ==== | ==== Playing Back Still Images ==== | ||
You can play back the still images on the LCD monitor. | You can play back the still images on the LCD monitor. | ||
| Line 220: | Line 221: | ||
# Select '''Yes''' with the '''<''' / '''>''' buttons (or Zoom lever), and press the SET (or Shutter) button. | # Select '''Yes''' with the '''<''' / '''>''' buttons (or Zoom lever), and press the SET (or Shutter) button. | ||
## To not erase, select '''No''', and press the SET (or Shutter) button. | ## To not erase, select '''No''', and press the SET (or Shutter) button. | ||
| + | |||
=== Transfer to Computer === | === Transfer to Computer === | ||
| + | The camera connects to your computer with the usb cable. | ||
<gallery> | <gallery> | ||
File:Sealife-16-transfer-to-computer.png | File:Sealife-16-transfer-to-computer.png | ||
</gallery> | </gallery> | ||
| − | === | + | === Menu Options === |
==== Capture Menu ==== | ==== Capture Menu ==== | ||
This menu is for the basic settings to be used when capturing still images. | This menu is for the basic settings to be used when capturing still images. | ||
| Line 355: | Line 358: | ||
Every SeaLife housing is tested for quality and a waterproof seal. It is your responsibility to properly care for the O-ring and O-ring contact surfaces to maintain a waterproof seal. Carefully follow these important O-ring care instructions. Not following these care instructions may cause the waterproof | Every SeaLife housing is tested for quality and a waterproof seal. It is your responsibility to properly care for the O-ring and O-ring contact surfaces to maintain a waterproof seal. Carefully follow these important O-ring care instructions. Not following these care instructions may cause the waterproof | ||
housing to leak, damaging the camera. '''You are 100% financially responsible for the equipment you check out to Media Loan.''' | housing to leak, damaging the camera. '''You are 100% financially responsible for the equipment you check out to Media Loan.''' | ||
| + | [[File:Sealife-19a-waterproof-seal.png|thumbnail|right|Seal]] | ||
| + | [[File:Sealife-19b-waterproof-seal.png|thumbnail|Seal]] | ||
| + | [[File:Sealife-19c-waterproof-seal.png|thumbnail|right|Seal]] | ||
# Carefully inspect O-ring and O-ring contact surfaces for damage (cuts, scratches, tears, cracks, dents and any other imperfections.) before every use. Rub finger along O-ring and O-ring contact surfaces to inspect for damage. Replace O-ring or return waterproof housing to Media Loan if the O-ring or O-ring contact surfaces are damaged. '''Do not use underwater housing if O-ring or O-ring contact surfaces are damaged.''' | # Carefully inspect O-ring and O-ring contact surfaces for damage (cuts, scratches, tears, cracks, dents and any other imperfections.) before every use. Rub finger along O-ring and O-ring contact surfaces to inspect for damage. Replace O-ring or return waterproof housing to Media Loan if the O-ring or O-ring contact surfaces are damaged. '''Do not use underwater housing if O-ring or O-ring contact surfaces are damaged.''' | ||
# Carefully inspect and clean O-ring and O-ring contact surfaces for sand, hair and other debris before every use. Clean o-ring and o-ring contact surfaces with cleaning brush provided. | # Carefully inspect and clean O-ring and O-ring contact surfaces for sand, hair and other debris before every use. Clean o-ring and o-ring contact surfaces with cleaning brush provided. | ||
# Make sure O-ring is completely seated into O-ring groove before sealing housing. O-ring must not be twisted when seated in the o-ring groove. | # Make sure O-ring is completely seated into O-ring groove before sealing housing. O-ring must not be twisted when seated in the o-ring groove. | ||
| − | + | '''After each use underwater:''' | |
| − | + | # Soak sealed housing in fresh water for about 15 minutes. Most dive boats offer special fresh water buckets specifically for underwater photo equipment. '''DO NOT put camera housing in fresh water designed or other dive equipment,''' like dive mask, because that water may contain detergents which are harmful to the housing. | |
| − | ## Press all the control buttons several times while waterproof housing is soaking to clean out any salt water, sand or dirt that has accumulated during usage. | + | ##Press all the control buttons several times while waterproof housing is soaking to clean out any salt water, sand or dirt that has accumulated during usage. |
| − | + | #Use clean, soft cloth to dry housing. Store camera and housing only after careful cleaning and when totally dry. | |
===== Quick waterproof test ===== | ===== Quick waterproof test ===== | ||
Before you depart on your dive trip: | Before you depart on your dive trip: | ||
| Line 369: | Line 375: | ||
* Repeat the above test. If housing still leaks contact Media Loan and return for service. | * Repeat the above test. If housing still leaks contact Media Loan and return for service. | ||
| − | ==== | + | ==== How To Install And Remove O-ring ==== |
| + | To Install O-ring: | ||
| + | '''Important:''' The O-ring and O-ring groove must be completely clean before installing O-ring. | ||
| + | * '''Step 1:''' Lay the O-ring over the O-ring groove making sure the O-ring is not twisted. Orient the O-ring with the more rounded corners on the hinge side of the housing. | ||
| + | * '''Step 2:''' Push the O-ring down into the groove. The O-ring should be evenly seated in the groove. | ||
| + | * '''Step 3:''' Carefully close housing to firmly seat O-ring and open housing again to inspect that O-ring is completely seated into groove. Do NOT grease the O-ring. | ||
| + | <br /> | ||
| − | ==== | + | To Remove O-ring: |
| + | * '''Step 1:''' Push O-ring along groove until it lifts. | ||
| + | * '''Step 2:''' Gently lift and remove O-ring from its groove. | ||
| + | |||
| + | <gallery> | ||
| + | File:Sealife-20a-oring.png|Install O-ring Step 1 | ||
| + | File:Sealife-20b-oring.png|Install O-ring Step 2 | ||
| + | File:Sealife-20c-oring.png|Remove O-ring Step 1 | ||
| + | File:Sealife-20d-oring.png|Remove O-ring Step 2 | ||
| + | </gallery> | ||
| + | |||
| + | ==== How To Open And Close Waterproof Housing ==== | ||
| + | * '''Step 1:''' Push in locking tab to open latch. | ||
| + | * '''Step 2:''' Open latch all the way to lift and release latch from housing. | ||
| + | * '''Step 3:''' Open Housing as shown so inner camera does not fall out. | ||
| + | * '''Step 4:''' Close housing and push down on latch as shown to firmly seat latch into housing. | ||
| + | * '''Step 5:''' Push down latch until locking tab clicks into place. | ||
| + | |||
| + | <gallery> | ||
| + | File:Sealife-22a-close-housing.png|Step 1 | ||
| + | File:Sealife-22b-close-housing.png|Step 2 | ||
| + | File:Sealife-23a-close-housing.png|Step 3 | ||
| + | File:Sealife-23b-close-housing.png|Step 4 | ||
| + | File:Sealife-23c-close-housing.png|Step 5 | ||
| + | </gallery> | ||
==== Installing the Flash Link optical cable adapter ==== | ==== Installing the Flash Link optical cable adapter ==== | ||
| + | The Flash Link adapter included with your camera connects the Flash Link optical cable to the DC1400 camera housing. This adapter is only needed when using the SeaLife external flash accessory. | ||
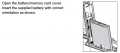
| + | * '''Step 1:''' Push the optical cable into one of the grooves so it’s locked firmly into position. The end of the cable must be directed at the camera’s flash but should not stick out beyond the adapter. The adapter has two grooves, so you can add another cable when using two flashes. | ||
| + | * '''Step 2:''' Attach the Flash Link adapter around the lens and push down until it locks firmly into place. There are two small locking mechanisms located on the outer edge of the adapter that should lock in to the camera housing. Make sure the adapter is oriented so it is aligned with the recessed flash window. | ||
| + | <gallery> | ||
| + | File:Sealife-24-flsah-link.png|Flash Link | ||
| + | File:Sealife-25-flsah-link.png|Flash Link | ||
| + | </gallery> | ||
| + | '''Please Note:''' | ||
| + | * If using two Flash Links, attach other cable in second groove and follow above instructions. | ||
| + | * Secure optical cable to Flash arm using Velcro® ties (included External Flash accessory). | ||
| + | * Refer to Flash Link optical cable instruction manual for more details and troubleshooting tips. | ||
==== How to set-up the Waterproof Housing ==== | ==== How to set-up the Waterproof Housing ==== | ||
| + | ===== Set up camera ===== | ||
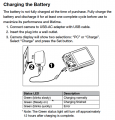
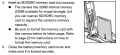
| + | # Insert fully charged lithium battery into camera. | ||
| + | # Clean camera lens with dry, clean cotton swab. | ||
| + | # Remove camera strap since this will prevent the camera from correctly seating itself inside the housing. | ||
| + | # Use the Easy Set-Up, located in the Capture menu, to guide you through the correct land or underwater camera settings. | ||
| + | # You can also manually set camera to Sea or Snorkel mode (when not using External Flash accessory) or External Flash mode (If using External Flash accessory). | ||
| + | ===== Set up housing ===== | ||
| + | ''Opening and loading of the housing should be done in a dry environment such as in an air-conditioned room to prevent trapping moist air in the housing which can cause the housing to fog while underwater.'' | ||
| + | # Open the housing by pushing in small locking tab and lift latch up. Do not extend housing lid beyond its stop point or damage may occur to the hinge area. | ||
| + | # Carefully inspect O-ring for damage and make sure O-ring is firmly seated in its groove. If O-ring is damaged and requires replacement, contact your local authorized SeaLife dealer. | ||
| + | # Clean the housing glass lens port using clean, dry cotton cloth. It is recommended to apply anti-fog solution to the inside surface of the housing lens port. | ||
| + | # Carefully insert camera into housing. Make sure camera is clean and dry. | ||
| + | # Insert one Moisture Muncher anti-fog (item #SL911) desicant capsules into special slot inside housing. As the desiccant absorbs moist air, it turns from blue to light pink. Replace desiccant capsule when color changes to light pink. | ||
| + | # Carefully clean O-ring and O-ring contact surfaces with cleaning brush provided. O-ring must not be wet when sealing housing, allow these areas to dry. ''O-ring must be absolutely clean of all hair, sand or other small particles.'' | ||
| + | # Do not allow any water droplets to get inside housing. This may cause the inside of the housing to fog. | ||
| + | # Close housing lid tightly. Make sure there are no obstructions that prevent the housing from closing. Make sure lid is tightly pressed into housing. | ||
| + | # Close housing latch. Make sure the lid is pressed evenly against the housing body look for obvious gaps which indicates something is trapped. The housing may leak if the lid is not evenly against the housing when closed. It is normal to see a small even gap between the housing lid and body. | ||
| + | # Avoid exposing housing to direct sunlight for prolonged periods of time. This may promote internal fogging. | ||
| + | ===== Test camera and housing ===== | ||
| + | # Press the small power button on the top of the housing to turn camera power on. | ||
| + | # Press the large shutter button on the outside of the housing to take a test picture. | ||
| + | # The power or shutter button should have a smooth action and return to its original resting position after pressing. It is normal to feel some resistance when pressing the power and shutter button. If buttons do not return to their normal position, soak the sealed housing in fresh water for a few minutes and press the buttons several times. | ||
| + | # Press the power button to turn camera power off. It is recommended to leave camera power off until you’re ready to use camera to preserve battery power. | ||
| + | ===== Before Entering Water ===== | ||
| + | # Most dive operations will have a water tub for underwater cameras. Use this tub to test the camera for leaks before entering the water. | ||
| + | # Hold housing underwater for about 15 seconds with the lens pointing upwards. Lift the housing out of the water keeping the lens pointing up and look at LCD display window for any water drops. | ||
| + | # If no leaks are detected, repeat step 2 but hold the camera underwater for about 2 minutes and inspect. | ||
| + | # If you detect any leaks, carefully dry and open the housing and inspect the O-ring seal. | ||
| + | # If no water tub is available, perform the above test immediately after entering the water. | ||
==== Using and cleaning the underwater housing and camera ==== | ==== Using and cleaning the underwater housing and camera ==== | ||
| + | '''Entering the water with waterproof housing''' | ||
| + | '''Important:''' Always obey dive safety rules as a priority. | ||
| + | * Do not jump into the water with the housing in your hand. Have someone hand it to you after you have entered the water. | ||
| + | '''After using housing underwate'''r | ||
| + | # Before entering dive boat, hand the housing to someone on the boat. | ||
| + | # Make sure the sealed housing is placed in a fresh water tub available on most dive boats. Press each button a few times to rinse out the salt water trapped under the buttons. This will clean the salt water from the housing and prevents the salt water from drying on the housing and O-ring. Never let water dry on the camera housing. Salt crystals can damage the O-ring, lens and attract moisture. Dry housing with clean soft towel after removing from fresh water tub. | ||
| + | # Do not expose camera and housing to direct sunlight – keep in a shaded area or under a dry towel. | ||
| + | # It is not recommended to remove camera from housing while on the dive boat. Allowing humid air to enter the housing may cause fogging. | ||
| + | # If you must open the housing while on the dive boat, make sure you and the housing are perfectly dry before opening the housing. Do not allow the inside of the housing or the camera to get wet. | ||
| + | '''Cleaning housing after use''' | ||
| + | # The sealed housing must be thoroughly cleaned with fresh water and dry before opening. | ||
| + | # Before opening housing, everything, including your hands, head and surrounding area must be totally dry. Have a dry towel handy. | ||
| + | # After opening the housing, clean the camera, O-ring area and all inside and outside parts with a clean, dry cotton cloth. | ||
=== Great Underwater Pictures Made Easy === | === Great Underwater Pictures Made Easy === | ||
| − | Taking underwater pictures is much different that taking land pictures. Here are | + | Taking underwater pictures is much different that taking land pictures. Here are the most important tips to taking great pictures underwater: |
| − | the most important tips to taking great pictures underwater: | + | ==== Crystal Clear Water ==== |
| − | + | Crystal Clear water is essential for good underwater pictures. Tiny particles floating in the water cause low visibility and poor picture quality. Avoid stirring up the sandy bottom with your fins. These floating particles cause small spots to appear in your picture, known as “backscatter.” Try to limit your shooting distance to 1/10 of the water visibility. For example, if the visibility is 60 feet (18 m), you should keep your shooting distance to within 6 feet (1.8m). Using the SeaLife Digital Pro Flash will reduce the “backscatter” effect. If you are not using the external flash accessory, keep the camera’s onboard flash turned OFF. | |
| − | Crystal Clear water is essential for good underwater pictures. Tiny particles | + | ==== Stay within the ideal shooting distance of 2 to 6 feet ==== |
| − | floating in the water cause low visibility and poor picture quality. Avoid | + | The ideal shooting distance is between 2 to 6 feet (0.6 to 1.8 meters). This distance will result in detailed, colorful pictures. Remember that light does not travel very far underwater, so the closer you are to your subject the more colorful the pictures will be. For best most colorful pictures, we advise using the optional SeaLife Digital Pro Flash. |
| − | stirring up the sandy bottom with your fins. These floating particles cause | + | ==== Move calmly and control your buoyancy before taking a picture ==== |
| − | small spots to appear in your picture, known as “backscatter.” Try to | + | It is very hard to take good pictures when you are moving. Look around for great picture opportunities. First, position yourself at the best angle and neutralize your buoyancy. Second, use the LCD monitor to perfectly frame your subject, check your shooting distance and keep the camera steady. Third, be calm and patient: Sometimes you have to wait a little bit so the fish that were frightened away, come back. Don’t chase the fish, let the fish come to you. Always be in control of your buoyancy before taking pictures and observe all safe‑diving rules. |
| − | limit your shooting distance to 1/10 of the water visibility. For example, | + | ==== Shoot many pictures of the same subject - If you don’t like it, delete it - later ==== |
| − | if the visibility is 60 feet (18 m), you should keep your shooting distance | + | One of the great advantages of digital cameras is that you can review and delete pictures later, so shoot several pictures of the same subject. One of the best ways to learn underwater photography is from your good pictures and bad pictures. |
| − | to within 6 feet (1.8m). Using the SeaLife Digital Pro Flash will reduce the | + | ==== Use the SeaLife Flash Accessories to enhance color and brightness ==== |
| − | “backscatter” effect. If you are not using the external flash accessory, | + | Water filters out light and red/yellow colors resulting in darker, blue images. The SeaLife DC1400 Dive and Snorkel mode setting will correct for lost colors, but is only effective to a depth of about 50ft/15m, depending available sunlight and water visibility. The most effective way to compensate for lost colors is by using artificial light, like the SeaLife Digital Pro Flash. The Flash easily mounts to the bottom of the housing. The flexible arm allows you to direct the flash at the subject. Even two flashes can be mounted onto the housing for an evenly illuminated and shadow-free image. This system blocks the built-in flash and prevents backscatter. The flexible flash arms allow quick adjustments of the flash.<br /> |
| − | the camera’s onboard flash turned OFF. | + | |
| − | + | Visit the SeaLife website for updated tips an advice. Any updates to the manual or additional tips and advice can be found on the SeaLife website at www.sealife-cameras.com. This operating guide adapted from the ''SeaLife DC1400 Underwater Camera Instruction Manual''. Go to [http://www.sealife-cameras.com/service/manuals.html www.sealife-cameras.com/service/manuals.html] for English, FRANÇAIS, DEUTSCH, ITALIANO, ESPAÑOL and NEDERLANDS versions. | |
| − | The ideal shooting distance is between 2 to 6 feet (0.6 to 1.8 meters). This | + | [[Category:Lab Stores]] |
| − | distance will result in detailed, colorful pictures. Remember that light does | + | |
| − | not travel very far underwater, so the closer you are to your subject the | + | |
| − | more colorful the pictures will be. For best most colorful pictures, we advise | + | |
| − | using the optional SeaLife Digital Pro Flash | + | |
| − | + | ||
| − | It is very hard to take good pictures when you are moving. Look around | + | |
| − | for great picture opportunities. First, position yourself at the best angle | + | |
| − | and neutralize your buoyancy. Second, use the LCD monitor to perfectly | + | |
| − | frame your subject, check your shooting distance and keep the camera | + | |
| − | steady. Third, be calm and patient: Sometimes you have to wait a little bit | + | |
| − | so the fish that were frightened away, come back. Don’t chase the fish, | + | |
| − | let the fish come to you. | + | |
| − | Always be in control of your buoyancy before taking pictures and observe all | + | |
| − | safe‑diving rules. | + | |
| − | + | ||
| − | delete it - later | + | |
| − | One of the great advantages of digital cameras is that you can review | + | |
| − | and delete pictures later, so shoot several pictures of the same subject. | + | |
| − | One of the best ways to learn underwater photography is from your good | + | |
| − | pictures and bad pictures. | + | |
| − | + | ||
| − | brightness | + | |
| − | Water filters out light and red/yellow colors resulting in darker, blue images. | + | |
| − | The SeaLife DC1400 Dive and Snorkel mode setting will correct for lost | + | |
| − | colors, but is only effective to a depth of about 50ft/15m, depending | + | |
| − | available sunlight and water visibility | + | |
| − | for lost colors is by using artificial light, like the SeaLife Digital Pro Flash. The | + | |
| − | Flash easily mounts to the bottom of the housing. The flexible arm allows | + | |
| − | you to direct the flash at the subject. Even two flashes can be mounted | + | |
| − | onto the housing for an evenly illuminated and shadow-free image. This | + | |
| − | system blocks the built-in flash and prevents backscatter. The flexible flash | + | |
| − | arms allow quick adjustments of the flash. | + | |
| − | + | ||
| − | Any updates to the manual or additional tips and advice can be found on | + | |
| − | the SeaLife website at www.sealife-cameras.com. | + | |
| − | [[Category: | + | |
Latest revision as of 08:27, 8 May 2013
THIS CAMERA IS RESTRICTED. Proficiency is gained through a workshop. Workshop participants must read this operating guide and the SeaLife Underwater Light and Flash Operating Guide and bring the written proficiency test answers to the workshop. In addition to reading this operating guide and attending the workshop, it is recommended that you download and read the SeaLife DC410 Manual PDF. You are 100% financially responsible for the equipment you check out from Media Loan.
Contents
- 1 Warnings and Cautions
- 2 Camera Parts & LCD Screens
- 3 Battery
- 4 SDHC Card
- 5 Speed Scrolling and Menu Navigation
- 6 Formatting the Memory Card or Internal Memory
- 7 Capture Mode
- 8 HD Video Mode
- 9 Playback Mode
- 10 Transfer to Computer
- 11 Menu Options
- 12 Underwater Housing Instructions
- 12.1 Important Notes on Waterproof Function and Waterproof Housing
- 12.2 Maintaining a waterproof seal
- 12.3 How To Install And Remove O-ring
- 12.4 How To Open And Close Waterproof Housing
- 12.5 Installing the Flash Link optical cable adapter
- 12.6 How to set-up the Waterproof Housing
- 12.7 Using and cleaning the underwater housing and camera
- 13 Great Underwater Pictures Made Easy
- 13.1 Crystal Clear Water
- 13.2 Stay within the ideal shooting distance of 2 to 6 feet
- 13.3 Move calmly and control your buoyancy before taking a picture
- 13.4 Shoot many pictures of the same subject - If you don’t like it, delete it - later
- 13.5 Use the SeaLife Flash Accessories to enhance color and brightness
Warnings and Cautions
Warnings
Continued use under the following conditions may cause fire or electric shock. Return to Media Loan for repair service if not working or damaged.
- If foreign objects or water have entered the camera, turn the power off and remove the battery.
- If the camera has fallen or its case has been damaged, turn the power off and remove the battery.
- Do not use the camera in areas near water, rain, snow, high humidity, sand, dirt or combustible gas* unless it is properly sealed in the waterproof housing provided.
Cautions
- Do not fire the flash close to anyone’s eyes.
- Do not subject the LCD monitor to impact.
- A camera is a precision instrument. Do not drop it, strike it or use excessive force when handling the camera.
- Do not remove the battery immediately after long period of continuous use.
- Do not wrap the camera or place it in cloth or blankets.
- Do not leave the camera in places where the temperature may rise significantly, such as inside a car.
- Before you move the camera, disconnect cords and cables.
Camera Parts & LCD Screens
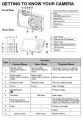
Camera Parts
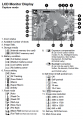
LCD Display
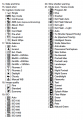
LCD Display
LCD Display
LCD Display


Battery
Insert Battery
Charge Battery


Notes on Battery Usage
- Extremely cold environments can shorten the battery life and reduce camera performance.
- When you are using a new rechargeable battery or a rechargeable battery that has not been used for an extended period of time, it may affect the number of images that can be captured. Therefore, to maximize its performance and lifetime, we recommend that you fully charge the battery and discharge it for at least one complete cycle before use.
- The battery and/or camera may feel warm after a long period of continuous use of the camera or the flash. This is normal and not a malfunction.
- Always keep the battery terminals clean.
- To prevent short-circuiting or fire, keep the battery away from other metal objects when carrying or storing.
SDHC Card
Each Media Loan SeaLife camera comes with a 32G SDHC Class 10 card. Please remove your images and format the card before returning to Media Loan. Replacement cost for the SDHC card is a flat $50 fine plus the $15 service fee. Please Note: To prevent damaging the SDHC memory card, be sure to turn off the power when inserting or removing. If inserting or removing the SDHC memory card with the power on, the camera will automatically turn off.
Insert Memory Card

There are two ways to navigate the menus:
Speed scrolling
When the Menu is open, use the Zoom lever to scroll through the menus and the shutter button to set the camera. This is how you adjust the camera settings when the camera is inside the underwater housing.
- Press the Menu button.
- Turn the zoom lever right to scroll down or right through the menu.
- Turn the zoom lever left to scroll up or left through the menu.
- The Shutter button functions like the Set button when the Menu is open. Press the Shutter button to confirm the setting.
This is the traditional method for scrolling through the menu. When the Menu is open, use the Nav button to scroll through the menus and press the Set button to confirm your selection. You can use traditional Nav button scrolling or Speed Scrolling when the camera is NOT inside the underwater housing.
- Press the Menu button.
- Use the Nav button to move up, down, left and right through the menus.
- Press the Set button to confirm the setting.
VERY IMPORTANT:
- Whenever the operating guide refers to ^ / v / < / >, you can use the zoom lever or navigation button.
- Whenever the operating guide refers to the SET button, you can use the Shutter or Set button.
Formatting the Memory Card or Internal Memory
This utility formats the internal memory (or memory card) and erases all stored images and data.
- Press the MENU button.
- Select Setup at the end of the menu with the ^ / v buttons and push the SET button.
- Select Format with the ^ / v buttons, then press the SET button.
- Select Yes with the < / > buttons, and press the SET button.
- To cancel formatting, select No and press the SET button.
- To exit from the Setup menu, press the Menu button.
Capture Mode
Capturing Images (Taking Pictures)
Media Loan's Sealife camera is equipped with a 3” full color LCD monitor to help you compose images, playback recorded images/video clips or adjust menu settings.
- Press the ON/OFF button to turn the power on.
- Press the MODE button and set the camera to Capture mode (not Video mode).
- Compose your image in the LCD monitor.
- Turn the zoom lever right to zoom in on the subject, and enlarge the subject on the LCD monitor.
- Turn the zoom lever left to zoom out on the subject, and provide a wider angle image.
- Press the shutter button.
- Pressing the shutter button down halfway automatically focuses and adjusts the exposure, and pressing the shutter button down fully captures the images.
- The focus area frame turns green when the camera is in focus and the exposure is calculated.
- When the focus or exposure is not suitable, the frame of the focus area turns red.
Please Note:
- Avoid using zoom while underwater to take pictures of subjects at far away distances. For best underwater pictures, keep your subjects within
2 m / 6 ft shooting distance.
- If the focus area frame is red, the light conditions or contrast may be too low. Try again until focus frame is green, or try focussing on a subject with higher contrast located at equal distance to the shooting subject.
- The Flash icon on the LCD display flashes on and off when the flash is charging. When the flash icon is solid, the camera is ready.
Setting the Focus
The camera uses an auto focus lens system. You can select among the six focus settings described below. Press the flower icon button and the < / > buttons to select the desired focus mode.
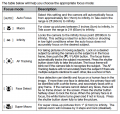
Focus Modes

About Easy Set-up Mode
The Easy Set-up mode is a fast and easy way to set the camera for underwater or land photography. Select Easy Set-up option located in the capture menu. Then, select the best choice from a series of options depending on the shooting condition and the accessories you are using.
Easy Setup

Setting the Scene Mode
“Scene modes” are pre-programmed camera settings to automatically give you the best picture possible under specific shooting conditions. You can use the Easy Set-up mode described on the previous page, or select among the following 33 scene modes.
- Press the MENU button and select Scene Mode using the down button (or zoom lever) and push the SET (or shutter button).
- Select the desired scene mode with the ^ / v / < / > buttons (or zoom lever), and press the SET button (or shutter button).
- Compose the image and press the shutter button.
Scene Mode
Scene Mode
Scene Mode


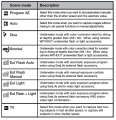
About External Flash and External Light Modes

If you are using the SeaLife Digital Pro Flash and/or Photo-Video Light accessories (supplied with Media Loan's SeaLife cameras), set the camera to one of the following Scene modes:
- Ext Flash Auto or Ext Flash Manual modes
- When using the Digital Pro Flash, but NOT the Photo-Video Light, set the Scene mode to Ext Flash Auto. The camera automatically adjusts the image exposure and white balance resulting in sharp, colorful underwater pictures. The camera is preprogrammed to account for the additional flash power resulting in optimal image exposure and brightness. The camera’s flash will always fire, which automatically triggers the Digital Pro Flash through the optical cable connection.
- For advanced underwater photographers who want to manually control the aperture and shutter speed, set the scene mode to Ext Flash MNL. Refer to the Digital Pro Flash instruction manual for more details on connecting and operating the flash.
- Ext Light mode.
- When using the Photo-Video Light, set the Scene mode to Ext Light. The camera automatically adjusts the image exposure and white balance resulting in sharp, colorful underwater pictures and video. The camera’s default setting is set to Flash Off, which is recommended to prevent backscatter. Refer to the Photo-video instruction manual for more details on connecting and operating the light.
- Ext Flash + Light mode.
- When using one Digital Pro Flash in combination with one Photo-Video Light (as supplied by Media Loan), set the Scene mode to Ext Flash+Light. This mode functions just like Ext Flash Auto mode, but uses a different white balance for video mode.
Exposure adjustment when the camera is in Ext Flash Mode:

About Dive and Snorkel Modes
The Dive and Snorkel Scene Modes are used to capture underwater pictures and video when NOT using the optional external flash accessory. Dive mode is ideal for scuba diving below 25ft/8m depth. Snorkel mode is ideal for underwater pictures above 25ft/8m depth. The camera will make color corrections to compensate for the loss of red colors typical in underwater photography.
To set DIVE mode:
- Press the MENU button.
- Select [Scene mode] with the ^ / v buttons (or zoom lever) and press the SET (or Shutter) button.
- Select DIVE mode with the ^ / v buttons (or zoom lever) and press SET (or Shutter) button.
To set SNORKEL mode:
- Press the MENU button.
- Select [Scene mode] with the ^ / v buttons (or Zoom lever) and press the SET (or Shutter) button.
- Select SNORKEL mode with the ^ / v buttons (or Zoom lever) and press SET (or Shutter) button.
In Dive and Snorkel modes, you can fine-tune the color correction depending on the water color and depth. These color correction options are located in the White Balance Menu. The default white balance setting for Dive mode is Blue Water > 25ft/8m. The default white balance setting for Snorkel mode is Blue Water < 25ft/8m. To select Dive or Snorkel modes, follow the Easy Setup mode described on page 25. You can also set the camera to Dive or Snorkel modes under the Scene mode menu.
Underwater white Balance settings
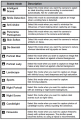
- BluWtr<25ft (Blue Water less than 25ft depth). This mode is ideal for snorkeling or shallow diving in “blue” water.
- BluWtr>25ft (Blue Water greater than 25ft depth). This mode is ideal fordeeper diving in “blue” water.
- GrnWtr<25ft (Green Water less than 25ft depth). This mode is ideal for snorkeling or shallow diving in “greener” water with higher algae content.
- GrnWtr>25ft (Green Water greater than 25ft depth). This mode is ideal for deeper diving in “greener” water with higher algae content.
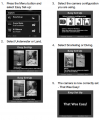
To change the color correction (White Balance):
- Press the MENU button.
- Select [White Balance] with the ^ / v buttons (or Zoom lever) and press the SET (or Shutter) button.
- Select between BluWtr<25ft, BluWtr>25ft, GrnWtr<25ft or GrnWtr>25ft with the ^ / v buttons (or Zoom lever) depending on your type of water conditions and press SET (or Shutter) button.
Please Note:
- The underwater color correction feature should only be used for nonflash photography.
- When the camera is in Dive and Snorkel mode, the scene displayed on the LCD display will appear red in color when you are on land. This is normal and will appear different when you are underwater.
- The underwater color correction feature will not work during night time diving or depths greater than 50ft / 15m depending on the amount of available light.
- For best UW pictures, keep the camera’s flash OFF when in Dive or Snorkel mode. If light conditions are too dark, we recommend using the SeaLife Digital Pro Flash.
About Spy Mode
This mode is used to capture continuous images at a preselected time interval. It is also useful for taking a series of pictures without being discovered by the subject, like Garden Eels or a bird’s nest with an egg hatching. A compact tripod accessory is helpful to keep the camera aimed at the subject. Spy mode is not available when recording video.
- Press the MENU button, and select Capture mode with the ^ / v buttons (or Zoom lever), and press the SET (or Shutter) button.
- Select [Spy] with the< / > buttons (or Zoom lever), and press the SET (or Shutter) button.
- Select the desired time interval with the < / > buttons (or Zoom lever) and press the SET (or Shutter) button.
- Press the MENU button to exit the menu.
- Aim the camera at the desired subject or scene.
- Press the shutter button and the camera will start capturing images at the pre-selected set time interval.
- The LCD display will now turn off to save battery power. The camera will continue to take images at the preselected time interval, until:
- Pressing the shutter button again.
- The memory is full.
- The battery is empty.
HD Video Mode
Recording HD Video Clips
This mode allows you to record continuous video with sound in 1280x720 (720p HD), 640x480 (VGA) or 320x240 (QVGA) pixel formats.
- Press the Mode button or UW housing Video button to select Video mode.
- Compose the image.
- Press the shutter button.
- The recording of the video clip will start.
- Pressing the shutter button one more time will end the recording of the video clip.
- The recording time depends on the storage size and the subject of the image to be recorded.
- The zoom function cannot be used during video recording.The camera will auto focus at the subject when pushing the shutter button to start recording. Once video recording has started, the auto focus is locked.
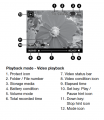
Playing Back Video Clips
You can play back recorded video clips on the camera.
- Press the PLAY button.
- The last image appears on the screen.
- Select the desired video clip with the < / > buttons (or Zoom lever).
- Press the SET (or Shutter) button to start playing video clip.
- A press of the < / > buttons (or Zoom lever) during playback allows fast forward play / fast reverse play.
- To stop video playback, press the v (or Flash) button. This stops playback and returns to the start of the video clip.
- To pause video playback, press the SET (or Shutter) button. This pauses video playback. To cancel pause, press the SET (or Shutter) button again.
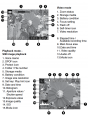
Playback Mode
Playing Back Still Images
You can play back the still images on the LCD monitor.
- Press the PLAY button.
- The last image appears on the screen.
- The images can be displayed in forward or reverse sequence with the < / > buttons (or Zoom lever).
- To view the previous image, press the < button (or turn Zoom lever left).
- To view the next image, press the > button (or turn Zoom lever right).
- Push the shutter button to enlarge the center of the image. Each push of the shutter button increases the zoom by one step: 2X - 3X - 4X and back to 1X normal view.
- Use the < / > / ^ / v buttons to see other enlarged parts of the picture. This function is not available when the camera is sealed inside the underwater housing.
Erasing Images and Video Clips in Playback Mode
- Press the PLAY button.
- The last image or video clip will be displayed on the screen.
- Select the image / video you want to erase with the < / > buttons (or Zoom lever).
- Press the MENU button.
- Select [Delete] with the < / > buttons (or Zoom lever), and press the SET (or Shutter) button.
- Single: Erases the selected image or video.
- All: Erases all of the images / videos except for the protected files.
- Select Yes with the < / > buttons (or Zoom lever), and press the SET (or Shutter) button.
- To not erase, select No, and press the SET (or Shutter) button.
Transfer to Computer
The camera connects to your computer with the usb cable.

Menu Options
Capture Menu
This menu is for the basic settings to be used when capturing still images.
- Press the Mode button and select Camera icon.
- Press the MENU button to enter the capture menu.
- Select the desired option item with the ^ / v buttons (or zoom lever), and press the SET (or Shutter) button to enter its respective menu.
- Select the desired setting with the < / > buttons (or Zoom lever), and press the SET (or Shutter) button.
- To exit from the menu, press the MENU button.
Quality
- This sets the quality (compression) at which the image is captured. A higher quality setting will result in less compression and larger image files. Fine, Standard, Economy.
Sharpness
- This sets the sharpness of the image that will be captured: Hard / Standard / Soft
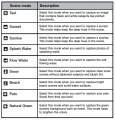
Color
- This sets the color of the image that will be captured: Standard / Vivid / Sepia / (B & W) / Red / Green / Blue / Yellow / Purple
Saturation
- This sets the saturation of the image that will be captured: High / Standard / Low
Metering
- This sets the metering method for calculating the exposure.
- Center: Averages the light metered from the entire frame, but gives greater weight to the subject matter at the center. This is the recommended setting for most pictures.
- Spot: A very small portion of the center of the screen is measured to calculate the correct exposure.
- Average: The entire area of the screen is measured, and the exposure is calculated.
Image Stab.
- This function minimizes the motion blur caused by hand “shake” or movement when you capture an image. It is recommended to keep the image stabilization: On / Off
- OFF to save battery power unless taking pictures in low light without flash.
Size
- This sets the size of the image that will be captured.
- 14M – 4288 x 3216
- 8M – 3264 x 2448
- 4M – 2304 x 1728
- 2M – 1600 x 1200
- VGA – 640 x 480
ISO
- This sets the sensitivity for capturing images. When the sensitivity is raised (and the ISO figure is increased), photography will become possible even in dark locations, but the more pixelated (grainier) the image will appear.
- Auto / 64 / 100 / 200 / 400 / 800 / 3200
White Balance
- This sets the white balance for a variety of lighting conditions and permits images to be captured that approach the conditions that are seen by the human eye.
- Auto
- BluWtr<25ft (Blue Water less than 25ft depth). This mode is ideal for shallow diving in “blue” water.
- BluWtr>25ft (Blue Water greater than 25ft depth). This mode is ideal for deeper diving in “blue” water.
- GrnWtr<25ft (Green Water less than 25ft depth). This mode is ideal for snorkeling or shallow diving in “greener” water with higher algae content.
- GrnWtr>25ft (Green Water greater than 25ft depth). This mode is ideal for deeper diving in “greener” water with higher algae content.
- Ext Flash WB. Use this white balance setting for underwater pictures when shooting with the external flash accessory
- Incandescent
- Fluorescent 1
- Fluorescent 2
- Daylight
- Cloudy
- Manual
Setting Manual White Balance (WB)
- The surrounding light may affect the color balance of your pictures or videos. For example, if a halogen light illuminates a white wall, the wall will have a yellow cast, while in fact it should be white. Underwater pictures tend to be more blue, because the water filters out red colors. The camera’s white balance menu includes settings that compensate for different lighting conditions found on land or underwater. You can also manually set the camera’s white balance if the options found in the white balance menu are not suitable. A digital camera needs to find a reference point which represents white. It will then calculate all the other colors based on this white point.
- To manually set the camera’s white balance,
- Select Manual WB located at the bottom of the White Balance menu
- Select “New WB” and press the Set or Shutter button
- Turn the Zoom lever and select “Yes”
- Hold the white slate (sold separately at your local dive dealer) about 10in /25cm in front of the camera lens, so it fills up the picture frame displayed on the LCD.
- Hold the white slate at a slight angle in the direction of the light source or sun.
- Press the SET (or Shutter) button to execute the Manual WB
- Do not use Manual WB with flash photography
- Reset Manual WB when changing depths or light conditions
- Select “Use Data” if you want to use the last Manual WB setting saved to the camera
- Push and hold the Menu button for about 4 seconds, as a shortcut to access the Manual white balance setting screen
Video Menu
This menu is for the basic settings to be used when recording video clips.
- Press the MODE (video) button and set the camera.
- Press the MENU button to enter the Video menu.
- Select the desired option item with the p / q buttons (or Zoom lever), and press the SET (or Shutter) button to enter its respective menu
- Select the desired setting with the t / u buttons (or Zoom lever), and press the SET (or Shutter) button
- To exit from the menu, press the MENU button
- White Balance
- See above.
- Size
- This sets the size of the video clip that will be captured.
- HD – 1280 x 720p
- VGA – 640 x 480
- Q-VGA – 320 x 240
- This sets the size of the video clip that will be captured.
- Quality
- This sets the quality (compression) at which the video clip is captured: Fine, Standard.
- Color
- This sets the color of the video clip that will be captured: Standard / Vivid / Sepia / B&W / Red / Green / Blue / Yellow / Purple
- Audio
- This sets whether or not to record audio at the time of video recording: On / Off
- Digital Zoom
- We recommend that you do not use Digital Zoom.
Underwater Housing Instructions
Important: Please carefully read and understand these instructions before using camera and housing underwater.
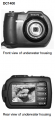
SeaLife DC1400 Underwater Housing:
- Depth rated and tested to 200 ft. (60m).
- Fully rubber armored for added shock protection.
- Fully-multi coated optical glass lens port for high light transmission.
- Accessory mount for attaching SeaLife Digital Pro Flash and/or Photo-Video Light accessories. (Supplied with this camera.)
- Large shutter button and wide spread buttons for easy control with dive gloves.
Important Notes on Waterproof Function and Waterproof Housing
- The inner camera is not waterproof or shock protected. Seal the camera inside the waterproof housing in areas of water, rain, snow, high humidity, sand, dirt or combustible gas*.
- Do not exceed the depth rating of 60m (200ft.) or the housing may become damaged and leak.
- Do not use underwater housing if O-ring or O-ring contact surfaces are damaged.
- Make sure O-ring is completely seated into O-ring groove before sealing housing.
- Carefully follow O-ring removal and installation instructions.
- Carefully close lid and latch to seal housing and make sure there are no obstructions that prevent housing from closing or sealing properly.
- Soak and rinse waterproof housing in fresh water for about 2 minutes after underwater use or if the housing becomes dirty.
- Press each button several times to clean out any saltwater, sand or dirt that may be trapped under the buttons.
- Use clean, soft cloth to dry housing.
- Store camera and housing only after careful cleaning and when totally dry.
- Do not let any moisture or dirt get inside housing when opening. This may result in damage to the inner camera.
- Make sure that you and the waterproof housing are completely dry before opening the waterproof door or changing the batteries or the SD memory card.
- Avoid opening housing in wet, sandy or humid environments. It is recommended to open and load the housing in dry cool air, such as inside an air conditioned room. This will prevent water or humidity from being trapped inside the housing, which may cause fogging to occur or damage the inner camera.
- Avoid getting sunscreen or suntan oil on the camera as it may cause discoloration of the surface. If any oil gets on the camera, wash it off immediately with warm water.
- The waterproof function does not apply to the camera’s accessories.
- The camera may sink if dropped in water, so be sure to attach the strap to your wrist or buoyancy control device (BCD) when using the camera in or near water.
- Store housing at room temperature in a clean and dry place.
- Do not expose housing to direct sunlight for prolonged periods of time.
- Do not store housing in extreme high temperatures, such as the trunk of your car.
- Keep the housing unlatched when storing for more than 3 months.
Underwater Housing
Underwater Housing


Maintaining a waterproof seal
Every SeaLife housing is tested for quality and a waterproof seal. It is your responsibility to properly care for the O-ring and O-ring contact surfaces to maintain a waterproof seal. Carefully follow these important O-ring care instructions. Not following these care instructions may cause the waterproof housing to leak, damaging the camera. You are 100% financially responsible for the equipment you check out to Media Loan.


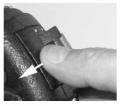
- Carefully inspect O-ring and O-ring contact surfaces for damage (cuts, scratches, tears, cracks, dents and any other imperfections.) before every use. Rub finger along O-ring and O-ring contact surfaces to inspect for damage. Replace O-ring or return waterproof housing to Media Loan if the O-ring or O-ring contact surfaces are damaged. Do not use underwater housing if O-ring or O-ring contact surfaces are damaged.
- Carefully inspect and clean O-ring and O-ring contact surfaces for sand, hair and other debris before every use. Clean o-ring and o-ring contact surfaces with cleaning brush provided.
- Make sure O-ring is completely seated into O-ring groove before sealing housing. O-ring must not be twisted when seated in the o-ring groove.
After each use underwater:
- Soak sealed housing in fresh water for about 15 minutes. Most dive boats offer special fresh water buckets specifically for underwater photo equipment. DO NOT put camera housing in fresh water designed or other dive equipment, like dive mask, because that water may contain detergents which are harmful to the housing.
- Press all the control buttons several times while waterproof housing is soaking to clean out any salt water, sand or dirt that has accumulated during usage.
- Use clean, soft cloth to dry housing. Store camera and housing only after careful cleaning and when totally dry.
Quick waterproof test
Before you depart on your dive trip:
- Place the sealed housing without camera inside in a tub of cold water for about one hour.
- Place a soft weight on top of the housing to keep it submerged.
- Carefully dry housing before opening it to inspect for a leaks. If the housing leaks, carefully inspect O-ring or replace O-ring as described above.
- Repeat the above test. If housing still leaks contact Media Loan and return for service.
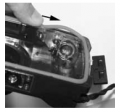
How To Install And Remove O-ring
To Install O-ring: Important: The O-ring and O-ring groove must be completely clean before installing O-ring.
- Step 1: Lay the O-ring over the O-ring groove making sure the O-ring is not twisted. Orient the O-ring with the more rounded corners on the hinge side of the housing.
- Step 2: Push the O-ring down into the groove. The O-ring should be evenly seated in the groove.
- Step 3: Carefully close housing to firmly seat O-ring and open housing again to inspect that O-ring is completely seated into groove. Do NOT grease the O-ring.
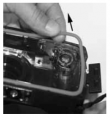
To Remove O-ring:
- Step 1: Push O-ring along groove until it lifts.
- Step 2: Gently lift and remove O-ring from its groove.
Install O-ring Step 1
Install O-ring Step 2
Remove O-ring Step 1
Remove O-ring Step 2


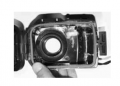
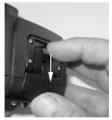
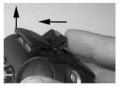
How To Open And Close Waterproof Housing
- Step 1: Push in locking tab to open latch.
- Step 2: Open latch all the way to lift and release latch from housing.
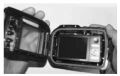
- Step 3: Open Housing as shown so inner camera does not fall out.
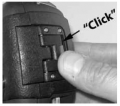
- Step 4: Close housing and push down on latch as shown to firmly seat latch into housing.
- Step 5: Push down latch until locking tab clicks into place.
Step 1
Step 2
Step 3
Step 4
Step 5


Installing the Flash Link optical cable adapter
The Flash Link adapter included with your camera connects the Flash Link optical cable to the DC1400 camera housing. This adapter is only needed when using the SeaLife external flash accessory.
- Step 1: Push the optical cable into one of the grooves so it’s locked firmly into position. The end of the cable must be directed at the camera’s flash but should not stick out beyond the adapter. The adapter has two grooves, so you can add another cable when using two flashes.
- Step 2: Attach the Flash Link adapter around the lens and push down until it locks firmly into place. There are two small locking mechanisms located on the outer edge of the adapter that should lock in to the camera housing. Make sure the adapter is oriented so it is aligned with the recessed flash window.
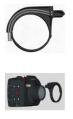
Flash Link
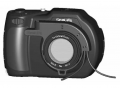
Flash Link


Please Note:
- If using two Flash Links, attach other cable in second groove and follow above instructions.
- Secure optical cable to Flash arm using Velcro® ties (included External Flash accessory).
- Refer to Flash Link optical cable instruction manual for more details and troubleshooting tips.
How to set-up the Waterproof Housing
Set up camera
- Insert fully charged lithium battery into camera.
- Clean camera lens with dry, clean cotton swab.
- Remove camera strap since this will prevent the camera from correctly seating itself inside the housing.
- Use the Easy Set-Up, located in the Capture menu, to guide you through the correct land or underwater camera settings.
- You can also manually set camera to Sea or Snorkel mode (when not using External Flash accessory) or External Flash mode (If using External Flash accessory).
Set up housing
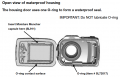
Opening and loading of the housing should be done in a dry environment such as in an air-conditioned room to prevent trapping moist air in the housing which can cause the housing to fog while underwater.
- Open the housing by pushing in small locking tab and lift latch up. Do not extend housing lid beyond its stop point or damage may occur to the hinge area.
- Carefully inspect O-ring for damage and make sure O-ring is firmly seated in its groove. If O-ring is damaged and requires replacement, contact your local authorized SeaLife dealer.
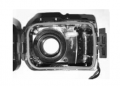
- Clean the housing glass lens port using clean, dry cotton cloth. It is recommended to apply anti-fog solution to the inside surface of the housing lens port.
- Carefully insert camera into housing. Make sure camera is clean and dry.
- Insert one Moisture Muncher anti-fog (item #SL911) desicant capsules into special slot inside housing. As the desiccant absorbs moist air, it turns from blue to light pink. Replace desiccant capsule when color changes to light pink.
- Carefully clean O-ring and O-ring contact surfaces with cleaning brush provided. O-ring must not be wet when sealing housing, allow these areas to dry. O-ring must be absolutely clean of all hair, sand or other small particles.
- Do not allow any water droplets to get inside housing. This may cause the inside of the housing to fog.
- Close housing lid tightly. Make sure there are no obstructions that prevent the housing from closing. Make sure lid is tightly pressed into housing.
- Close housing latch. Make sure the lid is pressed evenly against the housing body look for obvious gaps which indicates something is trapped. The housing may leak if the lid is not evenly against the housing when closed. It is normal to see a small even gap between the housing lid and body.
- Avoid exposing housing to direct sunlight for prolonged periods of time. This may promote internal fogging.
Test camera and housing
- Press the small power button on the top of the housing to turn camera power on.
- Press the large shutter button on the outside of the housing to take a test picture.
- The power or shutter button should have a smooth action and return to its original resting position after pressing. It is normal to feel some resistance when pressing the power and shutter button. If buttons do not return to their normal position, soak the sealed housing in fresh water for a few minutes and press the buttons several times.
- Press the power button to turn camera power off. It is recommended to leave camera power off until you’re ready to use camera to preserve battery power.
Before Entering Water
- Most dive operations will have a water tub for underwater cameras. Use this tub to test the camera for leaks before entering the water.
- Hold housing underwater for about 15 seconds with the lens pointing upwards. Lift the housing out of the water keeping the lens pointing up and look at LCD display window for any water drops.
- If no leaks are detected, repeat step 2 but hold the camera underwater for about 2 minutes and inspect.
- If you detect any leaks, carefully dry and open the housing and inspect the O-ring seal.
- If no water tub is available, perform the above test immediately after entering the water.
Using and cleaning the underwater housing and camera
Entering the water with waterproof housing Important: Always obey dive safety rules as a priority.
- Do not jump into the water with the housing in your hand. Have someone hand it to you after you have entered the water.
After using housing underwater
- Before entering dive boat, hand the housing to someone on the boat.
- Make sure the sealed housing is placed in a fresh water tub available on most dive boats. Press each button a few times to rinse out the salt water trapped under the buttons. This will clean the salt water from the housing and prevents the salt water from drying on the housing and O-ring. Never let water dry on the camera housing. Salt crystals can damage the O-ring, lens and attract moisture. Dry housing with clean soft towel after removing from fresh water tub.
- Do not expose camera and housing to direct sunlight – keep in a shaded area or under a dry towel.
- It is not recommended to remove camera from housing while on the dive boat. Allowing humid air to enter the housing may cause fogging.
- If you must open the housing while on the dive boat, make sure you and the housing are perfectly dry before opening the housing. Do not allow the inside of the housing or the camera to get wet.
Cleaning housing after use
- The sealed housing must be thoroughly cleaned with fresh water and dry before opening.
- Before opening housing, everything, including your hands, head and surrounding area must be totally dry. Have a dry towel handy.
- After opening the housing, clean the camera, O-ring area and all inside and outside parts with a clean, dry cotton cloth.
Great Underwater Pictures Made Easy
Taking underwater pictures is much different that taking land pictures. Here are the most important tips to taking great pictures underwater:
Crystal Clear Water
Crystal Clear water is essential for good underwater pictures. Tiny particles floating in the water cause low visibility and poor picture quality. Avoid stirring up the sandy bottom with your fins. These floating particles cause small spots to appear in your picture, known as “backscatter.” Try to limit your shooting distance to 1/10 of the water visibility. For example, if the visibility is 60 feet (18 m), you should keep your shooting distance to within 6 feet (1.8m). Using the SeaLife Digital Pro Flash will reduce the “backscatter” effect. If you are not using the external flash accessory, keep the camera’s onboard flash turned OFF.
Stay within the ideal shooting distance of 2 to 6 feet
The ideal shooting distance is between 2 to 6 feet (0.6 to 1.8 meters). This distance will result in detailed, colorful pictures. Remember that light does not travel very far underwater, so the closer you are to your subject the more colorful the pictures will be. For best most colorful pictures, we advise using the optional SeaLife Digital Pro Flash.
Move calmly and control your buoyancy before taking a picture
It is very hard to take good pictures when you are moving. Look around for great picture opportunities. First, position yourself at the best angle and neutralize your buoyancy. Second, use the LCD monitor to perfectly frame your subject, check your shooting distance and keep the camera steady. Third, be calm and patient: Sometimes you have to wait a little bit so the fish that were frightened away, come back. Don’t chase the fish, let the fish come to you. Always be in control of your buoyancy before taking pictures and observe all safe‑diving rules.
Shoot many pictures of the same subject - If you don’t like it, delete it - later
One of the great advantages of digital cameras is that you can review and delete pictures later, so shoot several pictures of the same subject. One of the best ways to learn underwater photography is from your good pictures and bad pictures.
Use the SeaLife Flash Accessories to enhance color and brightness
Water filters out light and red/yellow colors resulting in darker, blue images. The SeaLife DC1400 Dive and Snorkel mode setting will correct for lost colors, but is only effective to a depth of about 50ft/15m, depending available sunlight and water visibility. The most effective way to compensate for lost colors is by using artificial light, like the SeaLife Digital Pro Flash. The Flash easily mounts to the bottom of the housing. The flexible arm allows you to direct the flash at the subject. Even two flashes can be mounted onto the housing for an evenly illuminated and shadow-free image. This system blocks the built-in flash and prevents backscatter. The flexible flash arms allow quick adjustments of the flash.
Visit the SeaLife website for updated tips an advice. Any updates to the manual or additional tips and advice can be found on the SeaLife website at www.sealife-cameras.com. This operating guide adapted from the SeaLife DC1400 Underwater Camera Instruction Manual. Go to www.sealife-cameras.com/service/manuals.html for English, FRANÇAIS, DEUTSCH, ITALIANO, ESPAÑOL and NEDERLANDS versions.