Difference between revisions of "SeaLife Underwater Light and Flash Operating Guide"
(→Attaching light to underwater camera) |
(→Troubleshooting Guide) |
||
| (61 intermediate revisions by the same user not shown) | |||
| Line 1: | Line 1: | ||
| − | Optional reading: [http://www.evergreen.edu/medialoan/docs/manual_sealife_ProFlash.pdf SeaLife Underwater Photo-Video Light Instruction Manual] and [http://www.evergreen.edu/medialoan/docs/manual_sealife_PVLight.pdf SeaLife Digital Pro Flash Instruction Manual]. | + | Workshop participants must read this operating guide and the [[SeaLife DC1400 Underwater Camera Operating Guide]] and bring the written [[SeaLife DC1400 Underwater Camera Proficiency Test|proficiency test]] answers to the workshop. In addition to reading this operating guide and attending the workshop, it is recommended that you download and read the [http://www.evergreen.edu/medialoan/docs/manual_sealife_dc410.pdf SeaLife DC410 Manual PDF]. Optional reading: [http://www.evergreen.edu/medialoan/docs/manual_sealife_ProFlash.pdf SeaLife Underwater Photo-Video Light Instruction Manual] and [http://www.evergreen.edu/medialoan/docs/manual_sealife_PVLight.pdf SeaLife Digital Pro Flash Instruction Manual]. ''You are 100% financially responsible for the equipment you check out from Media Loan.''<br /> |
| + | |||
| + | The deeper you dive, less light penetrates the water. The water filters out red and yellow so everything looks blue. A powerful underwater flash system restores lost colors. | ||
| + | <gallery> | ||
| + | File:Sealife-proflash01-intro.png|With & Without Flash | ||
| + | File:Sealife-proflash12-overexp.png|Overexposed & Properly Exposed | ||
| + | </gallery> | ||
=== Safety Warnings === | === Safety Warnings === | ||
| − | Avoid using light above water for prolonged periods of time. The light is designed for underwater use to help displace heat. Turn light off if | + | * '''Avoid using light above water for prolonged periods of time.''' The light is designed for underwater use to help displace heat. Turn light off if any parts of the light become hot to the touch. |
| − | any parts of the light become hot to the touch | + | * '''Always discharge flash''' before opening the waterproof door, by moving the power switch to the “TEST” position, and then to the “OFF” position. This will discharge the high-voltage electricity stored in the flash. |
| − | + | * '''If foreign objects or water has entered the flash,''' discharge and turn off flash. Continued use in this state may cause fire or electrical shock. Contact and return to Media Loan for repairs. | |
| − | + | * '''If water has entered the light, immediately turn off power and discontinue use.''' Remove batteries and allow the inside to dry. Contact and return to Media Loan for repairs. | |
| − | + | * '''Do not attempt to access the electronic circuitry for any reason.''' The internal electronics uses high-voltage components that may result in severe electrical shock. | |
| − | + | * '''The On/Off/Test switch contains a powerful magnet.''' Keep away from compasses and electronics to avoid magnetic interference. | |
| − | ''' | + | * '''Use new or freshly-charged AA batteries.''' Do not mix old and new batteries together. |
| − | + | * '''Remove batteries from light before transporting, traveling or long periods of storage.''' | |
| − | + | * '''Do not expose light to heat or direct sunlight for prolonged periods of time.''' | |
| − | the power switch to the “TEST” position, and then to the “OFF” position. | + | * '''Observe all SCUBA dive safety rules and control your buoyancy at all times.''' Consult your dive instructor for dive safety questions. |
| − | This will discharge the high-voltage electricity stored in the flash. | + | |
| − | If foreign objects or water has entered the flash, discharge and turn off | + | |
| − | flash. Continued use in this state may cause fire or electrical shock. | + | |
| − | Contact | + | |
| − | Do not attempt to access the electronic circuitry for any reason. The | + | |
| − | internal electronics uses high-voltage components that may result in | + | |
| − | severe electrical shock. | + | |
| − | The On/Off/Test switch contains a powerful magnet. Keep away from | + | |
| − | compasses and electronics to avoid magnetic interference. | + | |
| − | Do not expose | + | |
| − | time. | + | |
| − | Observe all SCUBA dive safety rules and control your buoyancy at all | + | |
| − | times. Consult your dive instructor for dive safety questions | + | |
| − | + | ||
| − | + | ||
| − | + | ||
| − | + | ||
| − | + | ||
| − | + | ||
| − | + | ||
| − | + | ||
| − | + | ||
| − | + | ||
| − | + | ||
| − | + | ||
| − | + | ||
| − | + | ||
| − | + | ||
| − | + | ||
| − | + | ||
| − | + | ||
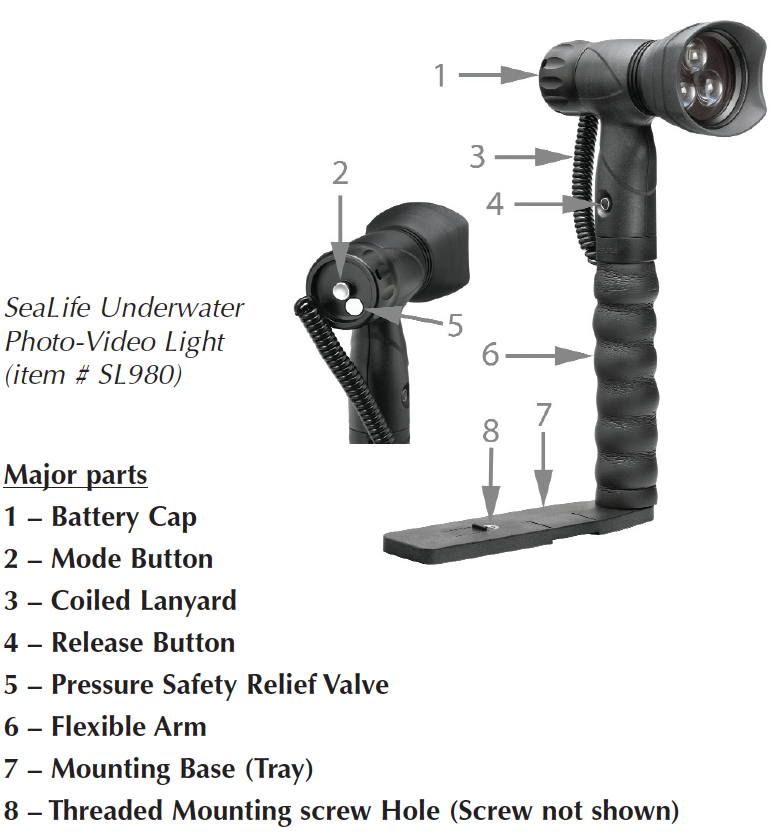
=== All the Pieces === | === All the Pieces === | ||
| + | <gallery> | ||
| + | File:Sealife-pvl01-contents.png | ||
| + | File:Sealife-pvl02-parts.png | ||
| + | </gallery> | ||
=== Batteries === | === Batteries === | ||
| − | ''' | + | '''Pro-Video Light:''' |
| − | + | * Loading batteries | |
| − | + | # Unscrew the battery cap | |
| − | + | # Remove the battery holder | |
| − | + | # Insert 4 new or freshly charged AA batteries into holder. | |
| − | + | # Make sure each battery is installed correctly according to the polarity markings on the battery holder. | |
| − | to the polarity markings on the battery holder. | + | # Make sure O-ring and sealing surfaces are perfectly clean and undamaged. |
| − | + | # Screw on battery cap (hand tighten – don’t use tools) | |
| − | clean and undamaged. | + | |
| − | + | ||
| − | ''' | + | '''Digital Pro Flash:''' |
| − | Insert 4 new or freshly charged AA batteries. Open the battery | + | * Insert 4 new or freshly charged AA batteries. |
| − | compartment cover and insert batteries according to the polarity | + | * Open the battery compartment cover and insert batteries according to the polarity markings above the battery compartment. |
| − | markings above the battery compartment. | + | |
| + | <gallery> | ||
| + | File:Sealife-proflash03-batteries.png|Pro-Video Light | ||
| + | File:Sealife-pvl03-batteries.png|Digital Pro Flash | ||
| + | </gallery> | ||
=== Preparing your flash === | === Preparing your flash === | ||
| − | ''' | + | [[File:Sealife-proflash02-prep.png|thumbnail|Preparing Digital Pro Flash]] |
| − | Unlock the latch by sliding | + | '''Digital Pro Flash:''' |
| − | down the safety lock. | + | * Unlock the latch by sliding down the safety lock. |
| − | Lift the latch and open the | + | * Lift the latch and open the waterproof door to access the battery compartment, pre-flash setting, and auto mode setting. |
| − | waterproof door to access the | + | '''Important:''' |
| − | battery compartment, pre-flash | + | * Make sure the flash and you are perfectly dry before opening the waterproof door. |
| − | setting, and auto mode setting. | + | * Open the waterproof door with the door pointing down, so any water trapped around the o-ring does not drip inside the flash. |
| − | Important: | + | |
| − | + | ||
| − | waterproof door. | + | |
| − | + | ||
| − | water trapped around the o-ring does not drip inside the flash. | + | |
=== Pre Flash === | === Pre Flash === | ||
| − | ''' | + | '''Digital Pro Flash:'''<br /> |
| − | Set the Pre Flash switch to the “0” position | + | |
| − | + | * Set the Pre Flash switch to the “0” position. | |
| − | + | ||
| − | + | '''What is a Pre-flash?'''<br /> | |
| − | What is a Pre-flash? | + | |
| − | Most digital cameras have one or more pre-flashes to assist in | + | Most digital cameras have one or more pre-flashes to assist in autofocus/auto-exposure setting of the camera. The Pre-Flashes occur before the camera’s primary flash fires. The Pre-Flash Setting switch tells the external flash how many pre-flashes to ignore before firing. For example, if your digital camera has 2 pre-flashes, you would set the Pre-Flash Setting switch to 2. The external flash will now ignore the two pre-flashes and fire on the third primary flash. SeaLife cameras do not have a pre-flash when the camera is in External Flash mode. |
| − | autofocus/auto-exposure setting of the camera. The Pre-Flashes | + | <gallery> |
| − | occur before the camera’s primary flash fires. The Pre-Flash | + | File:Sealife-proflash04-batteries.png|Pre-flash Switch |
| − | Setting switch tells the external flash how many pre-flashes to | + | </gallery> |
| − | ignore before firing. For example, if your digital camera has 2 | + | |
| − | pre-flashes, you would set the Pre-Flash Setting switch to 2. The | + | |
| − | external flash will now ignore the two pre-flashes and fire on the | + | |
| − | third primary flash. SeaLife cameras do not have a pre-flash when | + | |
| − | the camera is in External Flash mode. | + | |
| − | + | ||
| − | + | ||
| − | Pre-flash | + | |
| − | Switch | + | |
| − | + | ||
| − | + | ||
| − | + | ||
| − | + | ||
| − | + | ||
| − | + | ||
| − | + | ||
| − | + | ||
| − | + | ||
| − | + | ||
| − | + | ||
| − | + | ||
| − | + | ||
| − | + | ||
| − | + | ||
=== Auto mode === | === Auto mode === | ||
| − | ''' | + | '''Digital Pro Flash:''' |
| − | Set the Auto mode switch to the “1” position | + | * Set the Auto mode switch to the “1” position. |
| − | + | '''What is the Auto mode?''' <br /> | |
| − | + | ||
| − | + | Auto mode will automatically control the brightness of the external flash and help you to achieve optimal image exposure. When the external flash fires the light sensor located in the front of the flash will instantly measure the light reflecting from the subject. If it senses too much light, it will quickly stop the flash and prevent the image from being over-exposed. There are 4 possible Auto mode settings. settings. One of the four settings will be best depending on your camera type. The #1 setting will result in slightly less powerful flash brightness and #4 will result in a | |
| − | What is the Auto mode? | + | more powerful flash brightness. |
| − | Auto mode will automatically control the brightness of the | + | |
| − | external flash and help you to achieve optimal image exposure. | + | <gallery> |
| − | When the external flash fires the light sensor located in the front | + | File:Sealife-proflash05-auto.png|Auto Mode Switch |
| − | of the flash will instantly measure the light reflecting from the | + | </gallery> |
| − | subject. If it senses too much light, it will quickly stop the flash | + | |
| − | and prevent the image from being over-exposed. There are 4 | + | |
| − | possible Auto mode settings. settings. One of the four settings will | + | |
| − | be best depending on your camera type. The #1 setting will result | + | |
| − | in slightly less powerful flash brightness and #4 will result in a | + | |
| − | more powerful flash brightness. | + | |
| − | + | ||
| − | + | ||
=== Operating the Light === | === Operating the Light === | ||
| − | ''' | + | '''Pro-Video Light:''' |
| − | + | # Push and hold the mode button for 1 second to power ON the light. | |
| − | light. | + | # Push the mode button to change between the following light modes: |
| − | + | ## 100% ➜ 50% ➜ 25% ➜ Blinking ➜ SOS ➜ 100%........ | |
| − | modes: | + | # Push and hold the mode button for 2 seconds to power OFF the light. |
| − | 100% ➜ 50% ➜ 25% ➜ Blinking ➜ SOS ➜ 100%........ | + | <gallery> |
| − | + | File:Sealife-pvl04-operate.png|Operate | |
| − | the light. | + | </gallery> |
=== Maintaining a waterproof seal (Before your dive) === | === Maintaining a waterproof seal (Before your dive) === | ||
| − | ''' | + | '''Pro-Video Light:''' |
| − | + | # The light uses two O-rings to maintain a waterproof seal. | |
| − | + | # Every time you open the battery cap make sure the O-rings and sealing surfaces are clean, undamaged and lubricated. | |
| − | sealing surfaces are clean, undamaged and lubricated. | + | # Dampen a clean cotton cloth and wipe it around the o-ring and o-ring contact surfaces to remove any hair, sand or debris. |
| − | + | # Carefully inspect the o-ring for cuts, tears or other damage. Replace o-rings immediately if damaged. | |
| − | and o-ring contact surfaces to remove any hair, sand or debris. | + | # Lube O-rings if dry. Apply a small amount of silicone lube on your finger tip and wipe it around the O-rings. Wipe off excess lubricant. The o-ring should appear wet. |
| − | + | <gallery> | |
| − | Replace o-rings immediately if damaged. | + | File:Sealife-pvl05-seal.png|Pro-Video Light |
| − | + | File:Sealife-proflash06-seal.png|Digital Pro Flash | |
| − | your finger tip and wipe it around the O-rings. Wipe off excess | + | </gallery> |
| − | lubricant. The o-ring should appear wet. | + | '''Replacing the O-rings''' |
| + | # Use the O-ring Remover tool provided to lift and remove the O-ring. | ||
| + | # Carefully clean O-ring grooves and O-rings before installation | ||
| + | # Install O-rings by stretching and lifting O-ring into the groove. Do not roll the O-ring or allow it to twist. | ||
| + | # Apply a small amount of silicone lube on your finger tip and wipe it around the O-rings. Wipe off excess lubricant. The o-ring should appear wet. | ||
| + | <gallery> | ||
| + | File:Sealife-pvl06-orings.png|Pro-Video Light | ||
| + | </gallery> | ||
| − | ''' | + | '''Digital Pro Flash:''' |
| − | Close and seal the waterproof door. Make sure the O-ring is | + | * The flash uses an o-ring to maintain a waterproof seal and a gasket to prevent sand and debris from reaching the o-ring. Close and seal the waterproof door. Make sure the O-ring is perfectly clean and undamaged. Carefully close the waterproof door to make sure nothing gets trapped near the o-ring and make sure o-ring slips into position and does not get pinched. Make sure the waterproof door is completely closed. Lock the latch by sliding the safety lock upwards.<br /><br /> |
| − | perfectly clean and undamaged. Carefully close the waterproof | + | |
| − | door to make sure nothing gets trapped near the o-ring and make | + | |
| − | sure o-ring slips into position and does not get pinched. Make | + | |
| − | sure the waterproof door is completely closed. Lock the latch by | + | |
| − | sliding the safety lock upwards. | + | |
| − | + | ||
| − | + | ||
| − | + | ||
| − | + | ||
| − | + | ||
| − | + | '''Maintaining a waterproof seal'''<br /> | |
| − | ''' | + | |
| − | + | ||
| − | + | ||
| − | + | ||
| − | + | ||
| − | + | ||
| − | + | ||
| − | + | ||
| − | + | ||
| − | + | ||
| − | + | ||
| − | + | ||
| − | + | ||
| − | + | ||
| − | + | ||
| − | + | ||
| − | + | ||
| − | + | * Every flash is depth tested to ensure a waterproof seal. It is your responsibility to regularly inspect the o-ring and sealing surfaces and maintain this waterproof seal. Always perform these inspection procedures before using underwater. | |
| − | ''' | + | * '''Removing the O-ring and Gasket''' |
| − | + | # Grab white cable adapter and pull up to unplug the cable from the flash. Do NOT pull on the wire. | |
| − | + | # Remove gasket with your fingers. | |
| − | + | # Remove O-ring with your fingers | |
| − | the O-ring. | + | '''Important:''' Do NOT use tools or sharp objects or you may damage the O-ring or Gasket.<br /> |
| − | + | ||
| − | + | '''Inspecting and Cleaning the O-ring, Gasket and contact surfaces''' | |
| − | and | + | # Carefully inspect the O-ring and Gasket for cuts(A), tears(B). Replace O-ring and Gasket if damaged. |
| − | + | # Carefully inspect O-ring contact surfaces and groove for scratches or other damage. It is normal to see molding “seams” near the hinge and latch area. Contact Media Loan if the contact surfaces or groove are damaged. | |
| − | O-ring or | + | # Use a moist, clean cotton cloth to remove hair (C), sand (D), and other debris from O-ring, Gasket, O-ring groove and contact surfaces. Never stretch the O-ring or Gasket.<br /><br /> |
| − | + | ||
| − | + | '''Installing the O-ring and Gasket''' | |
| − | + | # Install clean O-ring into groove. Be careful not to twist O-ring. | |
| + | # Install clean Gasket, making sure it is completely seated against the waterproof door. The grooved side of the Gasket should sit flat against the waterproof door. | ||
| + | # Plug the cable adapter into the flash. Do NOT use force. Check that the white cable adapter is correctly oriented with the plug. | ||
| + | <gallery> | ||
| + | File:Sealife-proflash14a-oring.png|O-ring & Gasket | ||
| + | File:Sealife-proflash14-oring.png|Remove O-ring & Gasket | ||
| + | File:Sealife-proflash15-oring.png|Inspect & Clean | ||
| + | </gallery> | ||
| + | '''Important''' | ||
| + | # Do not lubricate the O-ring or Gasket. | ||
| + | # Do not exceed operating depth of 200ft/60m. | ||
| + | # Do not open waterproof door in wet environment. You and the flash must be dry before opening the waterproof door. | ||
| + | # Do not expose flash to direct sunlight for prolonged periods of time. | ||
| + | |||
| + | === Care and Maintenance (After your dive) === | ||
| + | # After each dive, soak the sealed light in fresh water for about 15 minutes to remove any residual salt, sand and dirt. Never allow the saltwater to dry on the light. | ||
| + | # Push the mode button about 10 times to clean any saltwater or sand trapped under the button. | ||
| + | # Let the water drain out of the two small holes located at the bottom of flexible arm (under the tray) | ||
| + | # Dry off the light with a towel. Make sure you and the light are dry before opening the waterproof battery cap. | ||
| + | # Remove batteries before storing the light. | ||
| + | # Allow light to thoroughly dry before storage. | ||
| + | # Never use any detergents, cleaners, solvents or chemicals to clean the light. | ||
| + | # Insert a Moisture-Muncher capsule inside the battery compartment during storage to help keep the inside dry and free of corrosion or mildew during storage. | ||
=== Attaching light to underwater camera === | === Attaching light to underwater camera === | ||
| − | ''' | + | '''Pro-Video Light & Digital Pro Flash:''' |
| + | Attach camera (housing) to the flash’s mounting base. Carefully hand-tighten the mounting screw. Do not over tighten! | ||
Important: | Important: | ||
| − | Only attach the light to cameras/housings with minimum thread depth of | + | * '''Important:''' Only attach the light to cameras/housings with minimum thread depth of 0.250” and using standard 1/4-20 tripod type thread. Never force or over-tighten the screw, or you may damage the housing seal and threads. |
| − | 0.250” and using standard 1/4-20 tripod type thread. | + | # Align the underwater camera to the light’s mounting screw and hand-tighten. Use small screw provided for mounting one light. |
| − | screw or you may damage the housing and threads. | + | # To attach both the video light and the flash, use longer screw. |
| − | + | ||
| − | hand-tighten. Use small screw provided for mounting one light. | + | |
| − | + | ||
| − | + | ||
| − | + | <gallery> | |
| − | + | File:Sealife-proflash07-attach.png|Camera & Flash | |
| − | + | File:Sealife-pvl07-attach.png|One - Both | |
| − | + | File:Sealife-pvl07a-attached.png|Camera, Light & Flash | |
| − | + | </gallery> | |
| − | + | ||
| − | + | ||
| − | === | + | === Connecting Flash Link Optical Cable === |
| − | ''' | + | '''Digital Pro Flash:''' |
| − | + | * The Digital Pro Flash includes the Flash Link optical cable. The optical cable is used to transmit the light from the camera to the light sensor under the external flash head. The external flash will fire when the light sensor detects light coming from the end of the cable. The external flash should come with the optical cable already attached to the flash head, but it is good to know how the cable can be removed and attached. | |
| + | * '''Connecting Flash Link Optical Cable to the external flash:''' | ||
| + | # Turn the cable locking screw counter-clockwise by about 2 rotations to loosen the clamping effect of the lock. Do not remove the locking screws. | ||
| + | # Insert the optical cable into the hole of the cable lock until the cable stops (make sure cable is pushed up all the way). | ||
| + | # Turn the cable locking screw clockwise to lock the cable into place ('''finger tight only''' – ''do not over tighten''). | ||
| + | |||
| + | * '''Connecting Flash Link Optical Cable to SeaLife cameras:''' | ||
| + | # Attach the other end of the optical cable to the camera adapter included with your SeaLife camera. | ||
| + | # Push the optical cable into one of the grooves so it’s locked firmly into position. The end of the cable must be directed at the camera’s flash but should not stick out beyond the adapter. The adapter has two grooves, so you can add another cable when using two flashes. | ||
| + | # Attach the Flash Link adapter around the lens and push down until it locks firmly into place. There are two small locking mechanisms located on the outer edge of the adapter that should lock in to the camera housing. Make sure the adapter is oriented so it is aligned with the recessed flash window. | ||
| + | # Once the cable and adapter is firmly attached, run the cables along the bottom of the flash base and up the flash arm. The cables should be secured to the flash arm using the Velcro ties provided with your flash accessory. | ||
| + | |||
| + | <gallery> | ||
| + | File:Sealife-proflash09-flashlink.png|Connect to External Flash | ||
| + | File:Sealife-proflash10-flashlink.png|Connect to Camera | ||
| + | File:Sealife-proflash11-velcro.png|Secure with Velcro Ties | ||
| + | </gallery> | ||
=== Aiming and releasing the light === | === Aiming and releasing the light === | ||
| − | ''' | + | '''Pro-Video Light:''' |
| − | The flexible flash arm is fully | + | * The flexible flash arm is fully adjustable to allow quick and easy aiming of the light. Check the camera display to make sure the light is aimed at the subject before taking a picture. |
| − | adjustable to allow quick and | + | * You can remove the light from the arm, by pushing the release button located on the side of the grip. |
| − | easy aiming of the light. Check | + | * '''Note:''' The flexible arm consists of seven 1-inch (2.5cm) links covered by foam rubber sleeve. You can bend the flexible arm in any direction, but if you force it beyond the point of resistance, the links will separate. If the links separate, you can reconnect it by pushing the links together until they snap in. |
| − | the camera display to make sure | + | <gallery> |
| − | the light is aimed at the subject | + | File:Sealife-pvl08-hold.png |
| − | before taking a picture. | + | </gallery> |
| − | You can remove the light from the | + | |
| − | arm, by pushing the release button | + | === Test the camera and flash (above water) === |
| − | located on the side of the grip. | + | '''Digital Pro Flash:''' |
| − | Note: The flexible arm consists of seven 1-inch (2.5cm) links | + | * Now that you have made all the correct settings to your flash and camera, take a few more test pictures to make sure the camera and external flash fires together. |
| − | covered by foam rubber sleeve. You can bend the flexible arm in any | + | # Power on the camera and flash. |
| − | direction, but if you force it beyond the point of resistance, the links | + | ## Make sure the camera settings are set as described in the [[SeaLife DC1400 Underwater Camera Operating Guide]]. |
| − | will separate. If the links separate, you can reconnect it by pushing | + | ## Turn the flash brightness power knob on the back of the flash to the for Auto. |
| − | the links together until they snap in. | + | # Wait for the red flash-ready light to turn on. |
| + | # Take a series of test picture while viewing the external flash at an angle. (Don’t look directly into the flash). | ||
| + | # The camera’s flash and the external flash should be firing together. | ||
| + | # If the external flash is not firing at the same time as the camera’s primary flash review the instructions above or refer to the trouble shooting guide below. | ||
=== Advanced Settings === | === Advanced Settings === | ||
| − | ''' | + | '''Pro-Video Light:''' |
| − | Customized Light Modes | + | *Customized Light Modes. You can select between 8 different light mode settings: |
| − | You can select between 8 different light mode settings: | + | ** Flash Cancellation ON or OFF: When ON, the light dims for 2 seconds when detecting external flash. |
| − | + | ** Light Power Levels: Single power (100%) or 3 power | |
| − | for 2 seconds when detecting external flash. | + | *** (100% ➜ 50% ➜ 25%) or 3 power plus signal |
| − | + | *** (100% ➜ 50% ➜ 25% ➜ Blinking ➜ SOS) | |
| − | (100% ➜ 50% ➜ 25%) or 3 power plus signal | + | ** Power Overdrive: Increase light power to 600 lumens for 2 minute. |
| − | (100% ➜ 50% ➜ 25% ➜ Blinking ➜ SOS) | + | To change the light mode setting, remove the battery cap and holder. On the bottom of the battery compartment you will see 3 small toggle switches. Use a pen or similar object to adjust the switches. |
| − | + | <gallery> | |
| − | 2 minute. | + | File:Sealife-pvl09-advanced.png|Toggle Switches |
| − | To change the light mode setting, remove the battery cap and | + | File:Sealife-pvl10-advanced.png|Light Mode Settings |
| − | holder. On the bottom of the battery compartment you will see | + | </gallery> |
| − | 3 small toggle switches. Use a pen or similar object to adjust the | + | |
| − | switches. | + | === External Flash adjustments: === |
| − | + | '''Digital Pro Flash:''' | |
| − | + | [[File:Sealife-proflash13-extflashadj.png|thumbnail|right|Brightness Control Knob]] | |
| − | compartment | + | * '''Flash Brightness Control''' |
| + | ** You can manually or automatically control the external flash brightness by adjusting the brightness control knob located on the backside of the flash head. Take some test pictures and experiment with the effect of the brightness control. | ||
| + | *** ''If the test image is over exposed'' (white or washed out colors), turn the power adjustment 1 or 2 bars clockwise to reduce the flash brightness and take another picture. Do this until the image exposure satisfactory. | ||
| + | *** ''If the test image is under exposed'' (dark), turn the power adjustment 1 or 2 bars counter clockwise to increase the flash brightness and take another picture. Do this until the image exposure is satisfactory. Remember that the flash will only reach about 6 ft to 8ft (1.8m to 2.4m) depending on water visibility, so make sure to keep your underwater shooting distance within that range. | ||
| + | *** If you turn the brightness control all the way counter clockwise, to the position, the flash will be set to Auto mode, and automatically adjust the flash brightness. | ||
| + | * '''Aiming the External Flash''' | ||
| + | ** The flexible flash arm is fully adjustable to allow quick and easy aiming of the flash. Make sure the flash head is directed at the subject before taking a picture. If the flash is not aimed correctly the image may appear underexposed (darker). | ||
| + | ** Remember that subjects appear closer underwater than they do on land, so direct the flash a little over the intended target to compensate for this underwater effect. | ||
| + | |||
| + | === Pre-dive Check-list === | ||
| + | # Insert new or freshly charged batteries into your camera, flash and light. | ||
| + | # Check that the camera and flash settings are correct and that the Flash Link optical cable is securely attached. | ||
| + | # Inspect the o-ring and clean off any dirt, sand or debris. Carefully close the waterproof door making sure nothing is trapped in the sealing area. | ||
| + | # Take a test picture to ensure the camera’s flash and external flash fire. Remember to power off the camera and flash to preserve battery power. | ||
| + | # Perform a quick waterproof test before you enter the water | ||
| + | ## Hold the camera and flash underwater. If you see a steady, continuous-stream of bubbles coming from the camera or flash sealing area remove the camera and flash from the water. | ||
| + | ## Dry off the camera and flash and inspect for any leaks. | ||
| + | ## Note: It is normal that some air bubbles will come from the flash arm and any other air pockets. Most dive boats with have a tub of fresh water intended for underwater cameras. | ||
| + | # Do not jump in the water with the camera in hand. Ask someone to hand you the camera after you enter the water. | ||
| + | ' | ||
| + | === After Each Dive === | ||
| + | # After your dive and before entering the dive boat, hand the camera to someone on the boat. | ||
| + | # Soak the sealed flash and camera in fresh water to remove salt, sand and dirt. '''Never allow the saltwater to dry on the camera or flash.''' | ||
| + | # After the camera and flash have been rinsed off, let the water drain out of the flash arm (which has small drainage holes at the bottom) and dry the sealed camera and flash with a towel. | ||
| + | # Make sure flash and light (and you) are dry before opening the waterproof door. If you can wait, keep your camera and flash sealed until you are in a dry location. | ||
| + | ## '''IMPORTANT:''' When opening the waterproof door, make sure to hold the flash with the door facing down. This will prevent water drops from entering the inside of the flash. | ||
| + | # '''Allow to thoroughly dry before storage.''' | ||
| + | # Insert fresh Moisture-Muncher capsules inside the battery compartment during storage. | ||
| + | |||
| + | |||
| + | === Troubleshooting Guide === | ||
| + | * '''Digital Pro Flash does not fire when switch is turned from “ON” to “TEST.”''' | ||
| + | ** Wait until the red flash-ready light turns on. If the ready light does not turn on, make sure the battery polarity is correct and battery contacts are clean. | ||
| + | ** Check the battery power. Replace or recharge batteries, if necessary. | ||
| + | ** If above does not correct the problem, contact Media Loan (360-867-62530. | ||
| + | * '''Digital Pro Flash fires as tested above, but does not fire when triggered by camera.''' | ||
| + | ** Make sure the power switch is set to “ON” position and the red flash-ready light is on. | ||
| + | ** Take a test pictures and make sure your camera’s inner flash fires. | ||
| + | ** Check that your camera settings are correct: set to External Flash mode. Make sure camera’s ready-light is on. | ||
| + | ** Make sure the flash pre-flash setting switch is properly set in accordance with the instructions provided in this manual. | ||
| + | ** Check that the Flash Link optical cable is attached correctly in accordance with the instructions provided. | ||
| + | * '''Flash fires sometimes but not all the time.''' | ||
| + | ** This is normally caused by a damaged Flash Link optical cable or if the optical cable is not set-up correctly. Inspect the optical cable for damage and make sure the cable is attached and secured in accordance with the instructions provided in this manual. | ||
| + | ** Check that your camera settings are correct: set to External Flash mode. Make sure camera’s ready-light is on. | ||
| + | * '''The recycle time is very long.''' | ||
| + | ** This is normally the result of low battery power. The flash recycle time should not be more than 7 to 8 seconds when the flash is set to full power. | ||
| + | ** Replace or recharge batteries if the recycle time is longer than 10 seconds. | ||
| + | * '''Dark areas in your pictures.''' | ||
| + | ** This is mostly likely caused by not aiming the flash at the subject or if the flash is somehow obstructed. | ||
| + | ** Areas further away from the camera will appear darker than closer objects. Maximum shooting distance is 6ft/1.8m to 8ft/2.4m depending on water visibility and the reflectivity of your subject. | ||
| + | ** Check the brightness control setting. Turn counterclockwise to increase flash brightness. Turn clockwise to decrease flash brightness. | ||
| + | ** The reflectivity of your subject will cause some areas to appear brighter than other areas. For example, dark coral needs more light than would white coral. Adjust flash intensity accordingly. | ||
| + | * '''Flash arm is loose and does not maintain correct aiming position.''' | ||
| + | ** Soak the arm in warm fresh water and flex the arm until all links are clean and free of detergents or lubricants. | ||
| + | ** Never use detergents when cleaning the flash arm. | ||
| + | ** Test flash arm flexibility underwater. The flash arm will become stiffer underwater.<br /><br /> | ||
| + | |||
| + | |||
| + | For updated trouble shooting information, refer to the SeaLife website at [http://www.sealife-cameras.com www.sealife-cameras.com]. | ||
| − | [[Category: | + | [[Category:Lab Stores]] |
Latest revision as of 08:24, 8 May 2013
Workshop participants must read this operating guide and the SeaLife DC1400 Underwater Camera Operating Guide and bring the written proficiency test answers to the workshop. In addition to reading this operating guide and attending the workshop, it is recommended that you download and read the SeaLife DC410 Manual PDF. Optional reading: SeaLife Underwater Photo-Video Light Instruction Manual and SeaLife Digital Pro Flash Instruction Manual. You are 100% financially responsible for the equipment you check out from Media Loan.
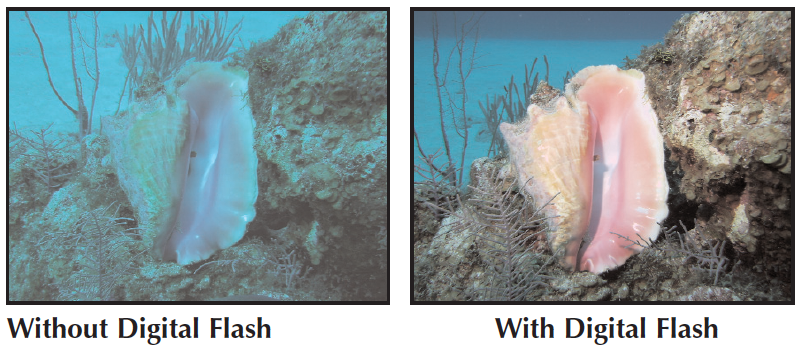
The deeper you dive, less light penetrates the water. The water filters out red and yellow so everything looks blue. A powerful underwater flash system restores lost colors.
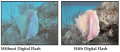
With & Without Flash
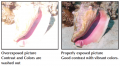
Overexposed & Properly Exposed

Contents
[hide]- 1 Safety Warnings
- 2 All the Pieces
- 3 Batteries
- 4 Preparing your flash
- 5 Pre Flash
- 6 Auto mode
- 7 Operating the Light
- 8 Maintaining a waterproof seal (Before your dive)
- 9 Care and Maintenance (After your dive)
- 10 Attaching light to underwater camera
- 11 Connecting Flash Link Optical Cable
- 12 Aiming and releasing the light
- 13 Test the camera and flash (above water)
- 14 Advanced Settings
- 15 External Flash adjustments:
- 16 Pre-dive Check-list
- 17 After Each Dive
- 18 Troubleshooting Guide
Safety Warnings
- Avoid using light above water for prolonged periods of time. The light is designed for underwater use to help displace heat. Turn light off if any parts of the light become hot to the touch.
- Always discharge flash before opening the waterproof door, by moving the power switch to the “TEST” position, and then to the “OFF” position. This will discharge the high-voltage electricity stored in the flash.
- If foreign objects or water has entered the flash, discharge and turn off flash. Continued use in this state may cause fire or electrical shock. Contact and return to Media Loan for repairs.
- If water has entered the light, immediately turn off power and discontinue use. Remove batteries and allow the inside to dry. Contact and return to Media Loan for repairs.
- Do not attempt to access the electronic circuitry for any reason. The internal electronics uses high-voltage components that may result in severe electrical shock.
- The On/Off/Test switch contains a powerful magnet. Keep away from compasses and electronics to avoid magnetic interference.
- Use new or freshly-charged AA batteries. Do not mix old and new batteries together.
- Remove batteries from light before transporting, traveling or long periods of storage.
- Do not expose light to heat or direct sunlight for prolonged periods of time.
- Observe all SCUBA dive safety rules and control your buoyancy at all times. Consult your dive instructor for dive safety questions.
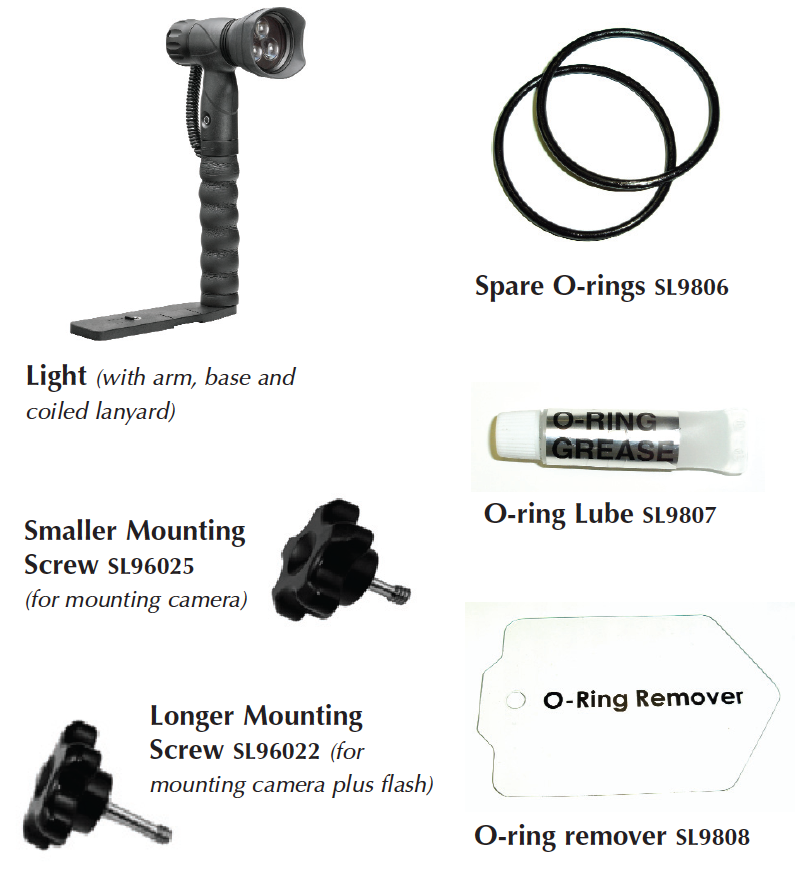
All the Pieces
Batteries
Pro-Video Light:
- Loading batteries
- Unscrew the battery cap
- Remove the battery holder
- Insert 4 new or freshly charged AA batteries into holder.
- Make sure each battery is installed correctly according to the polarity markings on the battery holder.
- Make sure O-ring and sealing surfaces are perfectly clean and undamaged.
- Screw on battery cap (hand tighten – don’t use tools)
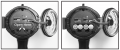
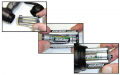
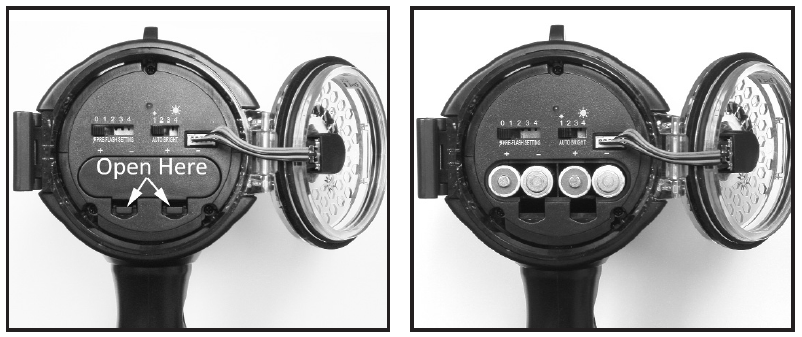
Digital Pro Flash:
- Insert 4 new or freshly charged AA batteries.
- Open the battery compartment cover and insert batteries according to the polarity markings above the battery compartment.
Pro-Video Light
Digital Pro Flash

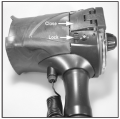
Preparing your flash
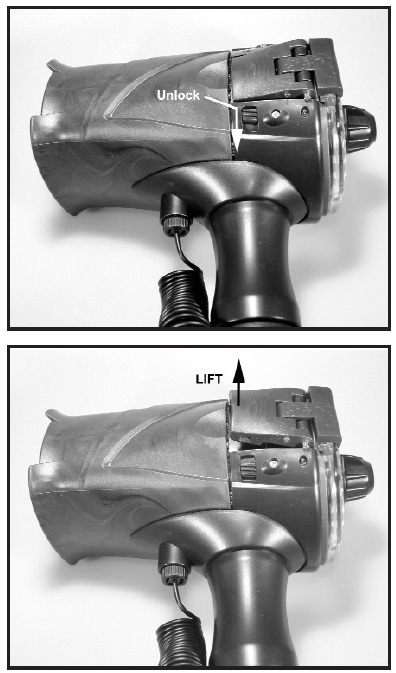
Digital Pro Flash:
- Unlock the latch by sliding down the safety lock.
- Lift the latch and open the waterproof door to access the battery compartment, pre-flash setting, and auto mode setting.
Important:
- Make sure the flash and you are perfectly dry before opening the waterproof door.
- Open the waterproof door with the door pointing down, so any water trapped around the o-ring does not drip inside the flash.
Pre Flash
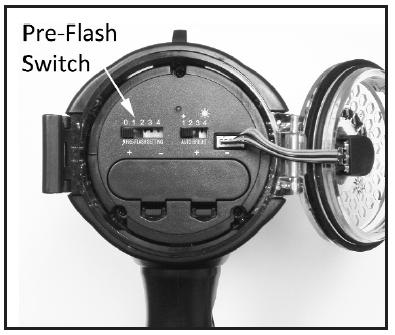
Digital Pro Flash:
- Set the Pre Flash switch to the “0” position.
What is a Pre-flash?
Most digital cameras have one or more pre-flashes to assist in autofocus/auto-exposure setting of the camera. The Pre-Flashes occur before the camera’s primary flash fires. The Pre-Flash Setting switch tells the external flash how many pre-flashes to ignore before firing. For example, if your digital camera has 2 pre-flashes, you would set the Pre-Flash Setting switch to 2. The external flash will now ignore the two pre-flashes and fire on the third primary flash. SeaLife cameras do not have a pre-flash when the camera is in External Flash mode.
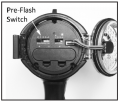
Pre-flash Switch
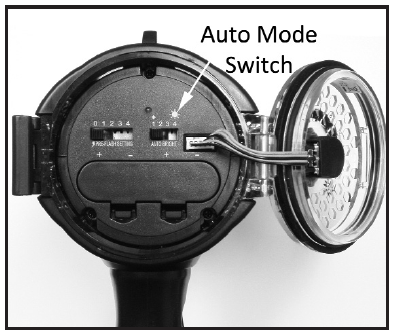
Auto mode
Digital Pro Flash:
- Set the Auto mode switch to the “1” position.
What is the Auto mode?
Auto mode will automatically control the brightness of the external flash and help you to achieve optimal image exposure. When the external flash fires the light sensor located in the front of the flash will instantly measure the light reflecting from the subject. If it senses too much light, it will quickly stop the flash and prevent the image from being over-exposed. There are 4 possible Auto mode settings. settings. One of the four settings will be best depending on your camera type. The #1 setting will result in slightly less powerful flash brightness and #4 will result in a more powerful flash brightness.
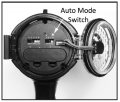
Auto Mode Switch
Operating the Light
Pro-Video Light:
- Push and hold the mode button for 1 second to power ON the light.
- Push the mode button to change between the following light modes:
- 100% ➜ 50% ➜ 25% ➜ Blinking ➜ SOS ➜ 100%........
- Push and hold the mode button for 2 seconds to power OFF the light.
Operate

Maintaining a waterproof seal (Before your dive)
Pro-Video Light:
- The light uses two O-rings to maintain a waterproof seal.
- Every time you open the battery cap make sure the O-rings and sealing surfaces are clean, undamaged and lubricated.
- Dampen a clean cotton cloth and wipe it around the o-ring and o-ring contact surfaces to remove any hair, sand or debris.
- Carefully inspect the o-ring for cuts, tears or other damage. Replace o-rings immediately if damaged.
- Lube O-rings if dry. Apply a small amount of silicone lube on your finger tip and wipe it around the O-rings. Wipe off excess lubricant. The o-ring should appear wet.
Pro-Video Light
Digital Pro Flash


Replacing the O-rings
- Use the O-ring Remover tool provided to lift and remove the O-ring.
- Carefully clean O-ring grooves and O-rings before installation
- Install O-rings by stretching and lifting O-ring into the groove. Do not roll the O-ring or allow it to twist.
- Apply a small amount of silicone lube on your finger tip and wipe it around the O-rings. Wipe off excess lubricant. The o-ring should appear wet.
Pro-Video Light

Digital Pro Flash:
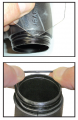
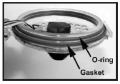
- The flash uses an o-ring to maintain a waterproof seal and a gasket to prevent sand and debris from reaching the o-ring. Close and seal the waterproof door. Make sure the O-ring is perfectly clean and undamaged. Carefully close the waterproof door to make sure nothing gets trapped near the o-ring and make sure o-ring slips into position and does not get pinched. Make sure the waterproof door is completely closed. Lock the latch by sliding the safety lock upwards.
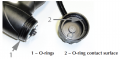
Maintaining a waterproof seal
- Every flash is depth tested to ensure a waterproof seal. It is your responsibility to regularly inspect the o-ring and sealing surfaces and maintain this waterproof seal. Always perform these inspection procedures before using underwater.
- Removing the O-ring and Gasket
- Grab white cable adapter and pull up to unplug the cable from the flash. Do NOT pull on the wire.
- Remove gasket with your fingers.
- Remove O-ring with your fingers
Important: Do NOT use tools or sharp objects or you may damage the O-ring or Gasket.
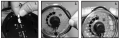
Inspecting and Cleaning the O-ring, Gasket and contact surfaces
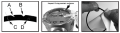
- Carefully inspect the O-ring and Gasket for cuts(A), tears(B). Replace O-ring and Gasket if damaged.
- Carefully inspect O-ring contact surfaces and groove for scratches or other damage. It is normal to see molding “seams” near the hinge and latch area. Contact Media Loan if the contact surfaces or groove are damaged.
- Use a moist, clean cotton cloth to remove hair (C), sand (D), and other debris from O-ring, Gasket, O-ring groove and contact surfaces. Never stretch the O-ring or Gasket.
Installing the O-ring and Gasket
- Install clean O-ring into groove. Be careful not to twist O-ring.
- Install clean Gasket, making sure it is completely seated against the waterproof door. The grooved side of the Gasket should sit flat against the waterproof door.
- Plug the cable adapter into the flash. Do NOT use force. Check that the white cable adapter is correctly oriented with the plug.
O-ring & Gasket
Remove O-ring & Gasket
Inspect & Clean

Important
- Do not lubricate the O-ring or Gasket.
- Do not exceed operating depth of 200ft/60m.
- Do not open waterproof door in wet environment. You and the flash must be dry before opening the waterproof door.
- Do not expose flash to direct sunlight for prolonged periods of time.
Care and Maintenance (After your dive)
- After each dive, soak the sealed light in fresh water for about 15 minutes to remove any residual salt, sand and dirt. Never allow the saltwater to dry on the light.
- Push the mode button about 10 times to clean any saltwater or sand trapped under the button.
- Let the water drain out of the two small holes located at the bottom of flexible arm (under the tray)
- Dry off the light with a towel. Make sure you and the light are dry before opening the waterproof battery cap.
- Remove batteries before storing the light.
- Allow light to thoroughly dry before storage.
- Never use any detergents, cleaners, solvents or chemicals to clean the light.
- Insert a Moisture-Muncher capsule inside the battery compartment during storage to help keep the inside dry and free of corrosion or mildew during storage.
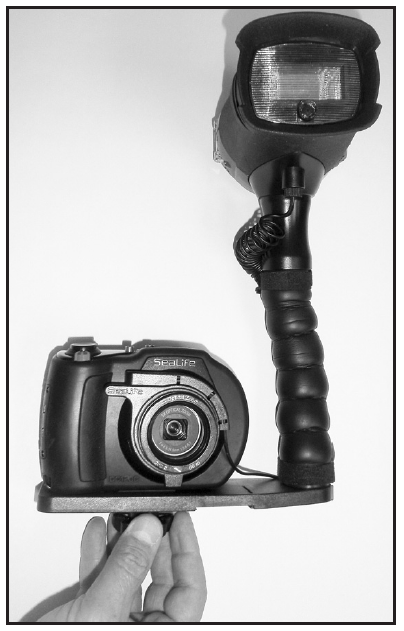
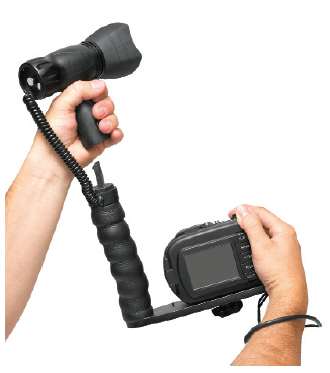
Attaching light to underwater camera
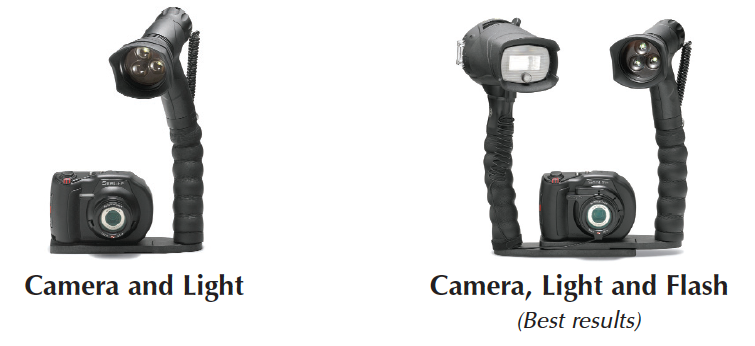
Pro-Video Light & Digital Pro Flash: Attach camera (housing) to the flash’s mounting base. Carefully hand-tighten the mounting screw. Do not over tighten! Important:
- Important: Only attach the light to cameras/housings with minimum thread depth of 0.250” and using standard 1/4-20 tripod type thread. Never force or over-tighten the screw, or you may damage the housing seal and threads.
- Align the underwater camera to the light’s mounting screw and hand-tighten. Use small screw provided for mounting one light.
- To attach both the video light and the flash, use longer screw.
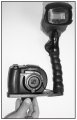
Camera & Flash
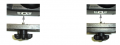
One - Both
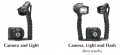
Camera, Light & Flash
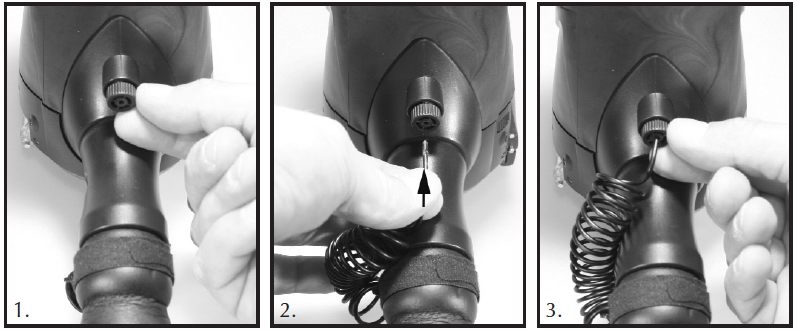
Connecting Flash Link Optical Cable
Digital Pro Flash:
- The Digital Pro Flash includes the Flash Link optical cable. The optical cable is used to transmit the light from the camera to the light sensor under the external flash head. The external flash will fire when the light sensor detects light coming from the end of the cable. The external flash should come with the optical cable already attached to the flash head, but it is good to know how the cable can be removed and attached.
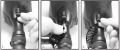
- Connecting Flash Link Optical Cable to the external flash:
- Turn the cable locking screw counter-clockwise by about 2 rotations to loosen the clamping effect of the lock. Do not remove the locking screws.
- Insert the optical cable into the hole of the cable lock until the cable stops (make sure cable is pushed up all the way).
- Turn the cable locking screw clockwise to lock the cable into place (finger tight only – do not over tighten).
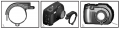
- Connecting Flash Link Optical Cable to SeaLife cameras:
- Attach the other end of the optical cable to the camera adapter included with your SeaLife camera.
- Push the optical cable into one of the grooves so it’s locked firmly into position. The end of the cable must be directed at the camera’s flash but should not stick out beyond the adapter. The adapter has two grooves, so you can add another cable when using two flashes.
- Attach the Flash Link adapter around the lens and push down until it locks firmly into place. There are two small locking mechanisms located on the outer edge of the adapter that should lock in to the camera housing. Make sure the adapter is oriented so it is aligned with the recessed flash window.
- Once the cable and adapter is firmly attached, run the cables along the bottom of the flash base and up the flash arm. The cables should be secured to the flash arm using the Velcro ties provided with your flash accessory.
Connect to External Flash
Connect to Camera
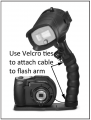
Secure with Velcro Ties

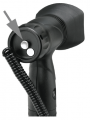
Aiming and releasing the light
Pro-Video Light:
- The flexible flash arm is fully adjustable to allow quick and easy aiming of the light. Check the camera display to make sure the light is aimed at the subject before taking a picture.
- You can remove the light from the arm, by pushing the release button located on the side of the grip.
- Note: The flexible arm consists of seven 1-inch (2.5cm) links covered by foam rubber sleeve. You can bend the flexible arm in any direction, but if you force it beyond the point of resistance, the links will separate. If the links separate, you can reconnect it by pushing the links together until they snap in.
Test the camera and flash (above water)
Digital Pro Flash:
- Now that you have made all the correct settings to your flash and camera, take a few more test pictures to make sure the camera and external flash fires together.
- Power on the camera and flash.
- Make sure the camera settings are set as described in the SeaLife DC1400 Underwater Camera Operating Guide.
- Turn the flash brightness power knob on the back of the flash to the for Auto.
- Wait for the red flash-ready light to turn on.
- Take a series of test picture while viewing the external flash at an angle. (Don’t look directly into the flash).
- The camera’s flash and the external flash should be firing together.
- If the external flash is not firing at the same time as the camera’s primary flash review the instructions above or refer to the trouble shooting guide below.
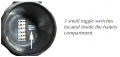
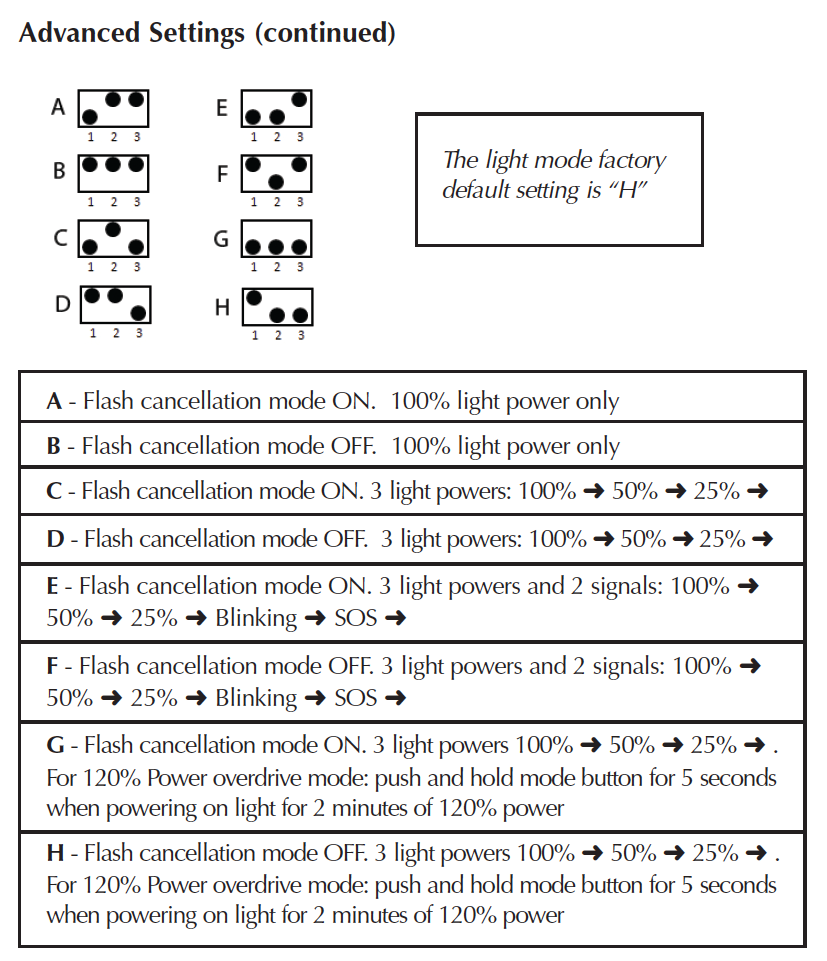
Advanced Settings
Pro-Video Light:
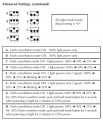
- Customized Light Modes. You can select between 8 different light mode settings:
- Flash Cancellation ON or OFF: When ON, the light dims for 2 seconds when detecting external flash.
- Light Power Levels: Single power (100%) or 3 power
- (100% ➜ 50% ➜ 25%) or 3 power plus signal
- (100% ➜ 50% ➜ 25% ➜ Blinking ➜ SOS)
- Power Overdrive: Increase light power to 600 lumens for 2 minute.
To change the light mode setting, remove the battery cap and holder. On the bottom of the battery compartment you will see 3 small toggle switches. Use a pen or similar object to adjust the switches.
Toggle Switches
Light Mode Settings

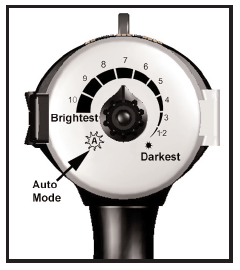
External Flash adjustments:
Digital Pro Flash:
- Flash Brightness Control
- You can manually or automatically control the external flash brightness by adjusting the brightness control knob located on the backside of the flash head. Take some test pictures and experiment with the effect of the brightness control.
- If the test image is over exposed (white or washed out colors), turn the power adjustment 1 or 2 bars clockwise to reduce the flash brightness and take another picture. Do this until the image exposure satisfactory.
- If the test image is under exposed (dark), turn the power adjustment 1 or 2 bars counter clockwise to increase the flash brightness and take another picture. Do this until the image exposure is satisfactory. Remember that the flash will only reach about 6 ft to 8ft (1.8m to 2.4m) depending on water visibility, so make sure to keep your underwater shooting distance within that range.
- If you turn the brightness control all the way counter clockwise, to the position, the flash will be set to Auto mode, and automatically adjust the flash brightness.
- You can manually or automatically control the external flash brightness by adjusting the brightness control knob located on the backside of the flash head. Take some test pictures and experiment with the effect of the brightness control.
- Aiming the External Flash
- The flexible flash arm is fully adjustable to allow quick and easy aiming of the flash. Make sure the flash head is directed at the subject before taking a picture. If the flash is not aimed correctly the image may appear underexposed (darker).
- Remember that subjects appear closer underwater than they do on land, so direct the flash a little over the intended target to compensate for this underwater effect.
Pre-dive Check-list
- Insert new or freshly charged batteries into your camera, flash and light.
- Check that the camera and flash settings are correct and that the Flash Link optical cable is securely attached.
- Inspect the o-ring and clean off any dirt, sand or debris. Carefully close the waterproof door making sure nothing is trapped in the sealing area.
- Take a test picture to ensure the camera’s flash and external flash fire. Remember to power off the camera and flash to preserve battery power.
- Perform a quick waterproof test before you enter the water
- Hold the camera and flash underwater. If you see a steady, continuous-stream of bubbles coming from the camera or flash sealing area remove the camera and flash from the water.
- Dry off the camera and flash and inspect for any leaks.
- Note: It is normal that some air bubbles will come from the flash arm and any other air pockets. Most dive boats with have a tub of fresh water intended for underwater cameras.
- Do not jump in the water with the camera in hand. Ask someone to hand you the camera after you enter the water.
'
After Each Dive
- After your dive and before entering the dive boat, hand the camera to someone on the boat.
- Soak the sealed flash and camera in fresh water to remove salt, sand and dirt. Never allow the saltwater to dry on the camera or flash.
- After the camera and flash have been rinsed off, let the water drain out of the flash arm (which has small drainage holes at the bottom) and dry the sealed camera and flash with a towel.
- Make sure flash and light (and you) are dry before opening the waterproof door. If you can wait, keep your camera and flash sealed until you are in a dry location.
- IMPORTANT: When opening the waterproof door, make sure to hold the flash with the door facing down. This will prevent water drops from entering the inside of the flash.
- Allow to thoroughly dry before storage.
- Insert fresh Moisture-Muncher capsules inside the battery compartment during storage.
Troubleshooting Guide
- Digital Pro Flash does not fire when switch is turned from “ON” to “TEST.”
- Wait until the red flash-ready light turns on. If the ready light does not turn on, make sure the battery polarity is correct and battery contacts are clean.
- Check the battery power. Replace or recharge batteries, if necessary.
- If above does not correct the problem, contact Media Loan (360-867-62530.
- Digital Pro Flash fires as tested above, but does not fire when triggered by camera.
- Make sure the power switch is set to “ON” position and the red flash-ready light is on.
- Take a test pictures and make sure your camera’s inner flash fires.
- Check that your camera settings are correct: set to External Flash mode. Make sure camera’s ready-light is on.
- Make sure the flash pre-flash setting switch is properly set in accordance with the instructions provided in this manual.
- Check that the Flash Link optical cable is attached correctly in accordance with the instructions provided.
- Flash fires sometimes but not all the time.
- This is normally caused by a damaged Flash Link optical cable or if the optical cable is not set-up correctly. Inspect the optical cable for damage and make sure the cable is attached and secured in accordance with the instructions provided in this manual.
- Check that your camera settings are correct: set to External Flash mode. Make sure camera’s ready-light is on.
- The recycle time is very long.
- This is normally the result of low battery power. The flash recycle time should not be more than 7 to 8 seconds when the flash is set to full power.
- Replace or recharge batteries if the recycle time is longer than 10 seconds.
- Dark areas in your pictures.
- This is mostly likely caused by not aiming the flash at the subject or if the flash is somehow obstructed.
- Areas further away from the camera will appear darker than closer objects. Maximum shooting distance is 6ft/1.8m to 8ft/2.4m depending on water visibility and the reflectivity of your subject.
- Check the brightness control setting. Turn counterclockwise to increase flash brightness. Turn clockwise to decrease flash brightness.
- The reflectivity of your subject will cause some areas to appear brighter than other areas. For example, dark coral needs more light than would white coral. Adjust flash intensity accordingly.
- Flash arm is loose and does not maintain correct aiming position.
- Soak the arm in warm fresh water and flex the arm until all links are clean and free of detergents or lubricants.
- Never use detergents when cleaning the flash arm.
- Test flash arm flexibility underwater. The flash arm will become stiffer underwater.
For updated trouble shooting information, refer to the SeaLife website at www.sealife-cameras.com.