Protected Files - WordPress
From Help Wiki
We have configured WordPress at sites.evergreen.edu to allow you to protect certain files and posts/pages while keeping other areas of your site publicly available.
To add a protected file to your page or post:
- Upload your file to your Media Library: Media > Add New (check the Protect Media Uploads box)
- Go to your post/page where you want the link to appear and click the “Add Media” button to insert the link into your post or page
- Click the Media Library tab to choose your already uploaded file
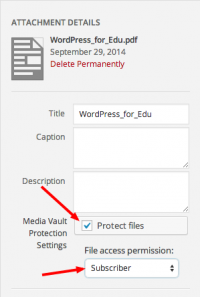
- Make sure the Protect Files checkbox is checked
- Set the Files access permissions to Subscriber. This will limit access to enrolled students in your course.
- Click the Insert into Page blue button to add a link to the protected file
Private Posts/Pages
With the Subscribers Only plugin activated, subscribers to your site will have access to Private posts or pages. Consider setting a post or page to Private for any areas of the site where you would not want Google to index. For example, a page that lists links to copyrighted materials that would never be publicly available.
To make a post/page private:
- Edit the page/post you want to make private
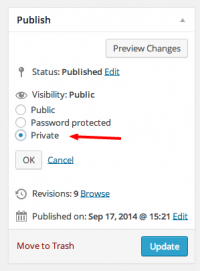
- In the “Publish” block click Edit next to Visibility
- Set the visibility to “private”
- Click OK and Update the post/page
Common Issues
My students get a 404 error when trying to access protected files
This is most likely because permissions were changed on the Media File after it was inserted into a post/page.
- Fix: Remove the link in your post/page and Add Media again to insert the link to the protected file location.


