Difference between revisions of "Links -WordPress"
From Help Wiki
m |
m (subst applied to Template:TwoColumn) |
||
| (18 intermediate revisions by 4 users not shown) | |||
| Line 1: | Line 1: | ||
| − | |||
| + | <div class="container-fluid"> | ||
| + | <div class="row"> | ||
| + | <div class="col-md-8"> | ||
| + | <div class="lead"> | ||
| + | Create a list of external links in your sidebar that will be displayed on every page of your site. | ||
| + | </div> | ||
| + | |||
| + | ===Enable the Links plugin=== | ||
| + | After WordPress version 3.5, blogroll links now require that you activate a plugin (sites created prior to the upgrade already have this functionality). | ||
| + | #From your Dashboard, go '''Plugins > Installed Plugins''' | ||
| + | #Click the '''Activate''' link for the '''Link Manager''' Plugin | ||
=== Create a new link === | === Create a new link === | ||
[[Image:Wp-links1.png|right|125px]] | [[Image:Wp-links1.png|right|125px]] | ||
| − | + | #From the dashboard of your site navigate to '''Links > Add New''' | |
| − | + | ||
| − | #From the dashboard of your site navigate to '''Links | + | |
#Fill out the Name of your link (this is what people will see to click on) | #Fill out the Name of your link (this is what people will see to click on) | ||
#Enter the web address including the http:// '''Tip:''' ''navigate to the site you're linking to in another tab and copy the url exactly. Paste it into web address field. '' | #Enter the web address including the http:// '''Tip:''' ''navigate to the site you're linking to in another tab and copy the url exactly. Paste it into web address field. '' | ||
| − | |||
==== Add the link to a link category ==== | ==== Add the link to a link category ==== | ||
| − | + | [[Image:Wp-links3.png|right|125px]] | |
Having multiple categories allows you to display individual link categories in unique sections of your sidebar. | Having multiple categories allows you to display individual link categories in unique sections of your sidebar. | ||
| − | |||
#Click '''Add new category''' (you'll only need to add a category the first time you do this) | #Click '''Add new category''' (you'll only need to add a category the first time you do this) | ||
#Name your category. The link category name will become the header for your list of links in the sidebar. | #Name your category. The link category name will become the header for your list of links in the sidebar. | ||
#Click Add to add your link category. Note: the link is automatically assigned to that new category | #Click Add to add your link category. Note: the link is automatically assigned to that new category | ||
#Save your link by clicking the blue "Update Link" button | #Save your link by clicking the blue "Update Link" button | ||
| + | === Display your link in the sidebar === | ||
| + | [[Image:Wp-links4.png|right|125px]] | ||
| + | Links are displayed in sidebar widgets. | ||
| + | #From your dashboard go to '''Appearance > Widgets''' | ||
| + | #From the Available Widgets panel drag and drop the '''Links''' widget over to the the right into the appropriate sidebar for your theme. A dashed box will appear when you can drop the widget. Note: Some themes have different available sidebar areas. [[Image:Wp-links5.png|right|325px]] | ||
| + | #Expand the link widget's panel by clicking its expand triangle [[Image:Wp-links6.png|right|125px]] | ||
| + | #From the drop-down choose the link category you'd like displayed in this section | ||
| + | #Click '''Save''' | ||
| − | == | + | <!-- end col-md-8 --> |
| + | </div> | ||
| + | <div class="col-md-1"></div> | ||
| + | <div class="col-md-3 sidebar"> | ||
| + | {{WordPress Tutorial Header}} | ||
| − | |||
| − | + | {{WordPress DesigningYourSite Sidebar}} | |
| − | + | ||
| − | + | ||
| − | + | ---- | |
| − | + | ||
| + | {{WordPress AddingFunctionalityToYourSite Sidebar}} | ||
| + | |||
| + | |||
| + | ---- | ||
| + | |||
| + | |||
| + | {{WordPress Help Sidebar}} | ||
| + | |||
| + | <!-- end col-md-3--> | ||
| + | </div> | ||
| + | <!-- end row--> | ||
| + | </div> | ||
| + | <!-- end container--> | ||
| + | </div> | ||
| + | <!-- Generator=Template:TwoColumn --> | ||
| + | __NOTOC__ | ||
| + | __NOEDITSECTION__ | ||
[[Category:Wordpress]] | [[Category:Wordpress]] | ||
| + | [[Category:Wordpress Tutorial]] | ||
Latest revision as of 16:01, 14 August 2017
Create a list of external links in your sidebar that will be displayed on every page of your site.
Enable the Links plugin
After WordPress version 3.5, blogroll links now require that you activate a plugin (sites created prior to the upgrade already have this functionality).
- From your Dashboard, go Plugins > Installed Plugins
- Click the Activate link for the Link Manager Plugin
Create a new link
- From the dashboard of your site navigate to Links > Add New
- Fill out the Name of your link (this is what people will see to click on)
- Enter the web address including the http:// Tip: navigate to the site you're linking to in another tab and copy the url exactly. Paste it into web address field.
Add the link to a link category
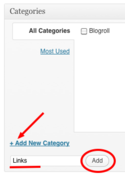
Having multiple categories allows you to display individual link categories in unique sections of your sidebar.
- Click Add new category (you'll only need to add a category the first time you do this)
- Name your category. The link category name will become the header for your list of links in the sidebar.
- Click Add to add your link category. Note: the link is automatically assigned to that new category
- Save your link by clicking the blue "Update Link" button
Display your link in the sidebar
Links are displayed in sidebar widgets.
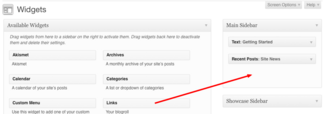
- From your dashboard go to Appearance > Widgets
- From the Available Widgets panel drag and drop the Links widget over to the the right into the appropriate sidebar for your theme. A dashed box will appear when you can drop the widget. Note: Some themes have different available sidebar areas.
- Expand the link widget's panel by clicking its expand triangle
- From the drop-down choose the link category you'd like displayed in this section
- Click Save


