Difference between revisions of "5.1 Mix Room - Overview"
From Help Wiki
(→Powering On Procedure) (Tag: VisualEditor) |
(→Overview) (Tag: VisualEditor) |
||
| (38 intermediate revisions by 3 users not shown) | |||
| Line 1: | Line 1: | ||
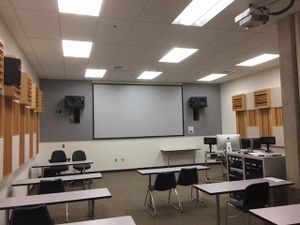
| + | [[File:5 1 Mix Room.jpeg|alt=This picture shows the 5.1 Mix Room as seen from the doorway.|thumb]] | ||
| + | |||
== Overview == | == Overview == | ||
The '''5.1 Mix Room''' is a hybrid classroom and student lab space. | The '''5.1 Mix Room''' is a hybrid classroom and student lab space. | ||
| Line 4: | Line 6: | ||
* There is one computer with audio and video software. | * There is one computer with audio and video software. | ||
* It's available for students to use for academic use. | * It's available for students to use for academic use. | ||
| − | * | + | * To be scheduled in the lab, users must have the '''Proficiency''' badge in Schedule Evergreen. |
| − | + | ||
=== Uses === | === Uses === | ||
| Line 12: | Line 13: | ||
* Mixing audio in a large room with multiple speaker options. | * Mixing audio in a large room with multiple speaker options. | ||
* Small group work or critique with audio and video productions apps. | * Small group work or critique with audio and video productions apps. | ||
| + | |||
| + | === Food and Drink === | ||
| + | * Since the 5.1 Room is also a classroom space food and drink are allowed on the classroom tables. | ||
| + | * Clean up any garbage and messes | ||
| + | * No food and drinks are allowed at the computer desk or on top of the equipment rack. | ||
=== Location === | === Location === | ||
| Line 19: | Line 25: | ||
===Access=== | ===Access=== | ||
| − | * The | + | * The lab requires the '''Audio - 5.1 Mix Room''' proficiency badge in Schedule Evergreen. |
| − | * Read the [ | + | * Read the [[Media Lab Access|Electronic Media Lab Access]] page for proficiency information |
* Read the [[Media Labs Access Policy]] for lab polices | * Read the [[Media Labs Access Policy]] for lab polices | ||
* Read the [[Scheduling General Access Media Labs]] article for scheduling procedures | * Read the [[Scheduling General Access Media Labs]] article for scheduling procedures | ||
| Line 27: | Line 33: | ||
===Help=== | ===Help=== | ||
| − | * Always enter your name and time into the logbook, along with any problems you encounter during your time in the lab | + | * Always enter your name and time into the logbook, along with any problems you encounter during your time in the lab. |
* If you need help, go to the '''Multimedia Lab''' 1404. | * If you need help, go to the '''Multimedia Lab''' 1404. | ||
| − | + | *The Evergreen Help Wiki – has helpful articles as well as various audio editing software cheat sheets. | |
| − | *The Evergreen Help Wiki – has helpful | + | |
** [[:Category:5.1 Mix Room|5.1 Mix Room]] | ** [[:Category:5.1 Mix Room|5.1 Mix Room]] | ||
| Line 36: | Line 41: | ||
* '''Adobe Audition''': Multi-track audio recording and mixing | * '''Adobe Audition''': Multi-track audio recording and mixing | ||
* '''Adobe Premiere Pro''': Video Editing | * '''Adobe Premiere Pro''': Video Editing | ||
| − | |||
| − | |||
* '''Pro Tools''': Multi-track audio recording and mixing. | * '''Pro Tools''': Multi-track audio recording and mixing. | ||
* '''Audacity''': Open source audio editor. | * '''Audacity''': Open source audio editor. | ||
| − | |||
| − | |||
* '''Ableton Live''': Music Production | * '''Ableton Live''': Music Production | ||
== Equipment == | == Equipment == | ||
| + | |||
| + | == Computer == | ||
| + | * Mac Studio and 64 GB of Ram | ||
| + | * 27" Dell monitor with built in webcam - 2560x1440 | ||
| + | * 21" Dell monitor - 1920 x1080 | ||
=== Computer Desk === | === Computer Desk === | ||
| Line 51: | Line 57: | ||
* It can be positioned to face the screen when mixing. | * It can be positioned to face the screen when mixing. | ||
* Be careful with the cable bundle connecting the desk to the equipment rack when moving the desk. | * Be careful with the cable bundle connecting the desk to the equipment rack when moving the desk. | ||
| − | Equipment Rack | + | |
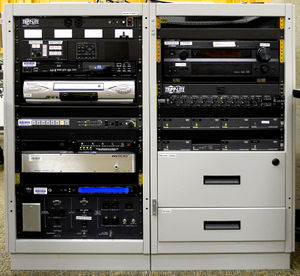
| + | === Equipment Rack === | ||
| + | [[File:5 1 Mix Room - Equipment Rack.jpg|alt=Image of the Equipment Rack located in the 5.1 Mix Room|thumb|Equipment Rack]] | ||
* The rack contains the following items | * The rack contains the following items | ||
** Switcher | ** Switcher | ||
** Blu-Ray Player | ** Blu-Ray Player | ||
** VHS | ** VHS | ||
| − | ** Grace | + | ** Grace M906 Monitor Controller |
| − | ** | + | ** Universal Audio Apollo x8 |
| − | ** Yahmaha | + | ** Yahmaha Receiver |
| − | ** Rack | + | ** Rack Mixer |
** Behringer Mixer: On top of rack | ** Behringer Mixer: On top of rack | ||
| − | === | + | ===Universal Audio Apollo x8=== |
| − | * | + | * Soundcard upon start up should be automatically set to 48k Sample Rate. |
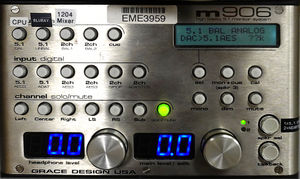
| + | [[File:5 1 Mix Room - Grace Controller - Full.jpg|alt=This image shows the Grace Monitor Controller found in the 5.1 Mix Room.|thumb|The Grace m906 Monitor Controller]] | ||
| − | === Grace m906 | + | === Grace m906 Monitor Controller === |
| − | * There are two parts to the | + | * There are two parts to the Grace controller. |
** On the computer desk is the controller. | ** On the computer desk is the controller. | ||
| − | ** In the rack | + | ** In the rack are the audio converters and connectors. |
| − | * The | + | * The Grace controller is used to select various sources and control the volume. |
| + | |||
| + | === Speakers === | ||
| + | * There are three sets of speakers in the room. | ||
| + | ** The 5.1 surround system | ||
| + | *** There is a center channel speaker behind the perforated screen. | ||
| + | ** The large JBL LSR speakers (mounted to the wall) | ||
| + | ** The small JBL LSR 305 nearfield speakers on the computer desk. | ||
== Lab Procedures == | == Lab Procedures == | ||
=== Powering On Procedure === | === Powering On Procedure === | ||
| − | # | + | # On the computer desk turn down the volume on the '''Grace''' '''m906 controller.''' |
| − | # Turn on the power | + | # Turn on the main power on the left side of the equipment rack. |
| − | # Wait 10 seconds for the sound card to fully start up, sound card should read 48k. | + | # Wait 10 seconds for the sound card to fully start up, sound card should read 48k Sample Rate. |
| − | # Power on the computer by pressing the button on the lower back of the computer | + | # Power on the computer by pressing the button on the lower left back corner of the computer. |
| − | + | # Log in to the computer and wait for the user template to fully start up. | |
| − | # Log in to the computer and wait for the user template to fully start up. | + | |
| − | + | === Audio Monitoring === | |
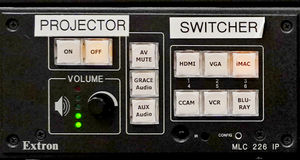
| + | [[File:5 1 Mix Room - Switcher.jpg|alt=This is a close-up of the Extron Switcher, located in the 5.1 Mix Room.|thumb|The Switcher (Extron)]] | ||
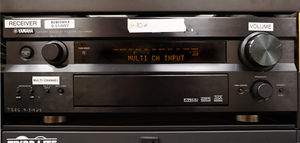
| + | [[File:5 1 Mix Room - Yamaha Receiver.jpg|alt=Close-up shot of the Yamaha Receiver.|thumb|Yamaha Receiver]] | ||
| + | *The '''Grace m906 controller''' is used to set the monitoring volume. | ||
| + | ** [[Audio Monitoring - 5.1 Mix Room]] | ||
| + | * On the '''switcher''' in the equipment rack, select '''Mac.''' | ||
| + | ** The computer is designed to send signals through the '''Universal Audio Apollo x8'''. | ||
| + | * On the '''Yamaha receiver...''' | ||
| + | ** Set the volume to '''-10dB'''. | ||
| + | ** Select Speaker switch A to use the surround sound speakers | ||
| + | ** Select Speaker switch B to use the large JBL speakers | ||
| + | *** Both sets can be on simultaneously. | ||
| + | *** Only select one set. | ||
| + | * On the '''Grace m906 Controller,''' select '''MAC''' | ||
| + | * Double click the '''Main Level''' knob | ||
| + | ** This will set the volume to 65dB | ||
| + | ** Adjust as needed | ||
| + | * HELPFUL TIP: If there is still no sound coming from the computers to the speakers, press the small '''Multi Channel input''' button on the Yamaha Receiver. | ||
| + | |||
| + | === Data Projector === | ||
| + | * The switcher in the equipment rack controls the data projector. | ||
| + | * Press the '''On''' button to turn on the projector. (Give it a moment to power on) | ||
| + | * Select a source: | ||
| + | ** Select '''Mac''' to show the computer. | ||
| − | + | * For more information on the projection system read [[Data Projector - 5.1 Mix Room]] | |
| − | * | + | |
| − | + | ||
| − | + | ||
| − | + | ||
| − | + | ||
| − | + | ||
===File Management=== | ===File Management=== | ||
| Line 94: | Line 127: | ||
All file storage on the computers is local to that computer. You need to back up your files in order to use them in another lab. | All file storage on the computers is local to that computer. You need to back up your files in order to use them in another lab. | ||
* Make a folder on the desktop to store your files. | * Make a folder on the desktop to store your files. | ||
| − | * When working save often | + | * When working, save often |
| − | * When you are done save and quit any applications you are using. | + | * When you are done, save and quit any applications you are using. |
* Back up your files to: | * Back up your files to: | ||
** OneDrive | ** OneDrive | ||
Latest revision as of 11:31, 14 November 2024
Overview
The 5.1 Mix Room is a hybrid classroom and student lab space.
- As a classroom it can hold about 25 students.
- There is one computer with audio and video software.
- It's available for students to use for academic use.
- To be scheduled in the lab, users must have the Proficiency badge in Schedule Evergreen.
Uses
- Media classroom space.
- Mixing audio in 5.1 surround sound.
- Mixing audio in a large room with multiple speaker options.
- Small group work or critique with audio and video productions apps.
Food and Drink
- Since the 5.1 Room is also a classroom space food and drink are allowed on the classroom tables.
- Clean up any garbage and messes
- No food and drinks are allowed at the computer desk or on top of the equipment rack.
Location
- Located in Evans Hall 1328
- From the lobby go past the Multimedia Lab and turn left at the garbage and recycling station.
- Go to the end of the hallway and turn left.
Access
- The lab requires the Audio - 5.1 Mix Room proficiency badge in Schedule Evergreen.
- Read the Electronic Media Lab Access page for proficiency information
- Read the Media Labs Access Policy for lab polices
- Read the Scheduling General Access Media Labs article for scheduling procedures
- Schedule time at Media Loan, the Multimedia Lab or via Self Service in Schedule Evergreen.
- Get keys from Media Loan for your scheduled time.
Help
- Always enter your name and time into the logbook, along with any problems you encounter during your time in the lab.
- If you need help, go to the Multimedia Lab 1404.
- The Evergreen Help Wiki – has helpful articles as well as various audio editing software cheat sheets.
Applications
- Adobe Audition: Multi-track audio recording and mixing
- Adobe Premiere Pro: Video Editing
- Pro Tools: Multi-track audio recording and mixing.
- Audacity: Open source audio editor.
- Ableton Live: Music Production
Equipment
Computer
- Mac Studio and 64 GB of Ram
- 27" Dell monitor with built in webcam - 2560x1440
- 21" Dell monitor - 1920 x1080
Computer Desk
- The computer desk has wheels and can be moved.
- It can be positioned in the front or to the side when someone is presenting to a class.
- It can be positioned to face the screen when mixing.
- Be careful with the cable bundle connecting the desk to the equipment rack when moving the desk.
Equipment Rack
- The rack contains the following items
- Switcher
- Blu-Ray Player
- VHS
- Grace M906 Monitor Controller
- Universal Audio Apollo x8
- Yahmaha Receiver
- Rack Mixer
- Behringer Mixer: On top of rack
Universal Audio Apollo x8
- Soundcard upon start up should be automatically set to 48k Sample Rate.
Grace m906 Monitor Controller
- There are two parts to the Grace controller.
- On the computer desk is the controller.
- In the rack are the audio converters and connectors.
- The Grace controller is used to select various sources and control the volume.
Speakers
- There are three sets of speakers in the room.
- The 5.1 surround system
- There is a center channel speaker behind the perforated screen.
- The large JBL LSR speakers (mounted to the wall)
- The small JBL LSR 305 nearfield speakers on the computer desk.
- The 5.1 surround system
Lab Procedures
Powering On Procedure
- On the computer desk turn down the volume on the Grace m906 controller.
- Turn on the main power on the left side of the equipment rack.
- Wait 10 seconds for the sound card to fully start up, sound card should read 48k Sample Rate.
- Power on the computer by pressing the button on the lower left back corner of the computer.
- Log in to the computer and wait for the user template to fully start up.
Audio Monitoring
- The Grace m906 controller is used to set the monitoring volume.
- On the switcher in the equipment rack, select Mac.
- The computer is designed to send signals through the Universal Audio Apollo x8.
- On the Yamaha receiver...
- Set the volume to -10dB.
- Select Speaker switch A to use the surround sound speakers
- Select Speaker switch B to use the large JBL speakers
- Both sets can be on simultaneously.
- Only select one set.
- On the Grace m906 Controller, select MAC
- Double click the Main Level knob
- This will set the volume to 65dB
- Adjust as needed
- HELPFUL TIP: If there is still no sound coming from the computers to the speakers, press the small Multi Channel input button on the Yamaha Receiver.
Data Projector
- The switcher in the equipment rack controls the data projector.
- Press the On button to turn on the projector. (Give it a moment to power on)
- Select a source:
- Select Mac to show the computer.
- For more information on the projection system read Data Projector - 5.1 Mix Room
File Management
All file storage on the computers is local to that computer. You need to back up your files in order to use them in another lab.
- Make a folder on the desktop to store your files.
- When working, save often
- When you are done, save and quit any applications you are using.
- Back up your files to:
- OneDrive
- External hard drive
- Thumb drive
- If you have a fast USB three hard drive you can work directly of your drive.
- We erase all the student files off the computers on Thursday of every eval week.

