Live Transcription with Zoom
From Help Wiki
Zoom has an automatic transcription service called Live Transcription that has been enabled for all Evergreen participants.
Use Live Transcription in a Meeting
The host needs to turn on Live Transcription in each meeting that is needed in.
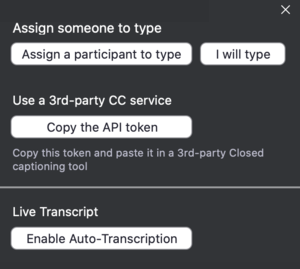
- Click Live Transcript on the bottom Zoom Toolbar
- Click Enable Auto-Transcription
- Transcripts will appear at the bottom of the Zoom window
- To turn off Live Transcription Disable Auto-Transcription
Participant Controls
Once Live Transcription is enabled in a meeting participants can choose how to view the transcripts.
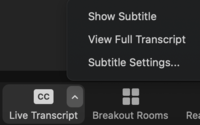
- Click Live Transcript on the bottom Zoom Toolbar
- Three options will appear
- Show Subtitles - displays subtitles at the bottom of the window
- View Full Transcript - displays the transcript with speakers name and a timestamp in the Transcript window
- Subtitle Settings - will open the settings to adjust the size of the subtitles
Save Transcripts
- Hosts have the ability to enable or disable the setting that allows participants to save the meeting transcripts.
- This setting is for all of the hosts meetings. It can not be set for each individual meeting.
- Go to evergreen.zoom.us and sign in with your Evergreen account
- In the top left click Settings
- At the top click Meeting
- Click In Meeting (Advanced)
- Under Save Captions enable or disable the setting for Allow participants to save fully closed captions or transcripts
Notes
- The Transcript window will replace the Participant and Chat windows
- At the top of the Transcript window click the upside-down arrow and select Pop Out to convert to a separate window
- Live Transcription is not available in breakout rooms.
- Turning on Live Transcriptions does not create subtitles in the cloud recordings
- The Audio Transcription feature needs to be turned on for video subtitles
Keywords: web conferencing


