Difference between revisions of "Create a New Post - WordPress"
From Help Wiki
| Line 14: | Line 14: | ||
====See also: [http://wikis.evergreen.edu/computing/index.php/Categories_and_Tags Categorize your Post]==== | ====See also: [http://wikis.evergreen.edu/computing/index.php/Categories_and_Tags Categorize your Post]==== | ||
* Learn how to create and apply categories and add tags to your posts. | * Learn how to create and apply categories and add tags to your posts. | ||
| − | * Categories | + | * Categories can be used to group related posts together, and quickly tell readers what a post is about. |
| | | | ||
{{WordPress Content Sidebar}} | {{WordPress Content Sidebar}} | ||
Revision as of 16:21, 31 December 2015
Create Posts and Pages using WordPress.
Create a New Post
- From the Posts menu (at left), select Add New.
- Enter a title for the post in the field under Add New Post.
- Use the editor to enter and format text and/or use the Add Media button to add an image to your post.
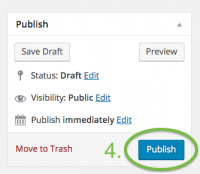
- Click the blue Publish button (at right) to save your changes.
NOTE: Once a post has been published, the Publish button changes to Update.
Edit an Existing Post
- Click Edit Post in the admin bar at top, or in the post itself (may appear as Edit)
- After making your revisions, click Update (at right) to save your changes.
See also: Categorize your Post
- Learn how to create and apply categories and add tags to your posts.
- Categories can be used to group related posts together, and quickly tell readers what a post is about.
WordPress Tutorial
Writing and Managing your Content
- Posts and Pages and what’s the difference?
- Creating a New Post
- Creating a New Page
- Categorizing Posts
- Controlling comments
Still have WordPress questions?
- Create a Help Ticket or call the Computer Center at 360-867-6227
- WordPress FAQ - common questions
- WordPress Tutorial - step by step introduction
Still have WordPress questions?
- Create a Help Ticket or call the Computer Center at 360-867-6227
- WordPress FAQ - common questions
- WordPress Tutorial - step by step introduction


