Difference between revisions of "WordPress Tutorial for sites.evergreen.edu"
m |
(Tag: VisualEditor) |
||
| Line 91: | Line 91: | ||
# Navigate to Appearance > Header and note the native image dimensions required for your theme. Most important is to note width. | # Navigate to Appearance > Header and note the native image dimensions required for your theme. Most important is to note width. | ||
# Download/create an image that is equal to or greater than the recommended width for your theme’s header image. Note: if you use a smaller image it will be enlarged and will look blurry. Don’t worry about getting it exact as there is a built-in cropping tool will adjust your image to the proper dimensions. | # Download/create an image that is equal to or greater than the recommended width for your theme’s header image. Note: if you use a smaller image it will be enlarged and will look blurry. Don’t worry about getting it exact as there is a built-in cropping tool will adjust your image to the proper dimensions. | ||
| − | }} | + | }}3. Upload the image and set it as the header image: |
| + | * click on Customize in the admin bar across top | ||
| + | * then in the pop-out menu at left, click on Header Image | ||
| + | * click on the image to select it and set it as the header | ||
| + | * click on the blue Publish button (should then change to "Published") | ||
| + | * then click on the "x" in upper left corner to close the menu and return to the site | ||
{{Collapsed2|Site Visibility and Protection| | {{Collapsed2|Site Visibility and Protection| | ||
'''Who Has Access to Your Site?''' | '''Who Has Access to Your Site?''' | ||
Revision as of 12:19, 24 September 2018
Everything you need to know to get started using WordPress at sites.evergreen.edu.
WordPress Overview
What is WordPress?
- WordPress is a web authoring platform. All you need is a browser and a connection to the internet to get started.
Why WordPress?
- A site that can grow with your teaching. Your WordPress site can be used across multiple quarters or courses. Build, refine, update, rinse and repeat.
- Ease of use. WordPress is renowned as one of the easiest web authoring platforms to work in. At the same time, a huge selection of additional functionality is available via plugins when you’re ready to take the next steps.
- WordPress sites look good. Theme selection and the ability to easily customize the look and feel of your site are as good as it gets without having to hire a developer. Most newer themes are designed to be responsive and adjust to work well on any size mobile device.
- Media friendly. Easily embed your own media content or from a variety of popular sources.
- Site templates help you get up and running quickly with a new course site. Take a look at the template feature table and choose the one that’s right for your style of teaching.
How is sites.evergreen.edu different from blogs.evergreen.edu?
- Sites.e.e is focused on supporting faculty work
- New site templates speed up the development time for faculty
- Curated theme and plugin sets focused on supporting faculty work
- Sites is running over https:// (SSL) so that content can easily be linked to or embedded into other secure sites
- Blogs.evergreen.edu which will continue to host community blogs and student academic journals
Requesting a WordPress site for your course
- Contact Academic Computing or go to the Academic Resources link in my.evergreen.edu to request a WordPress site be created for your course.
- Choose a template - familiarize yourself with the various template options and make sure to note which template you would like to use for your new site.
Accessing your site
- Navigate to your site’s URL
- Click the Login link in the footer of the site and login via CAS using your Evergreen username and password
Logging in from the sites.evergreen.edu homepage
- Navigate to https://sites.evergreen.edu and click the login/register link in the sidebar
- Login via CAS using your Evergreen username and password
- Navigate to your site via the My Sites menu in the upper left admin bar
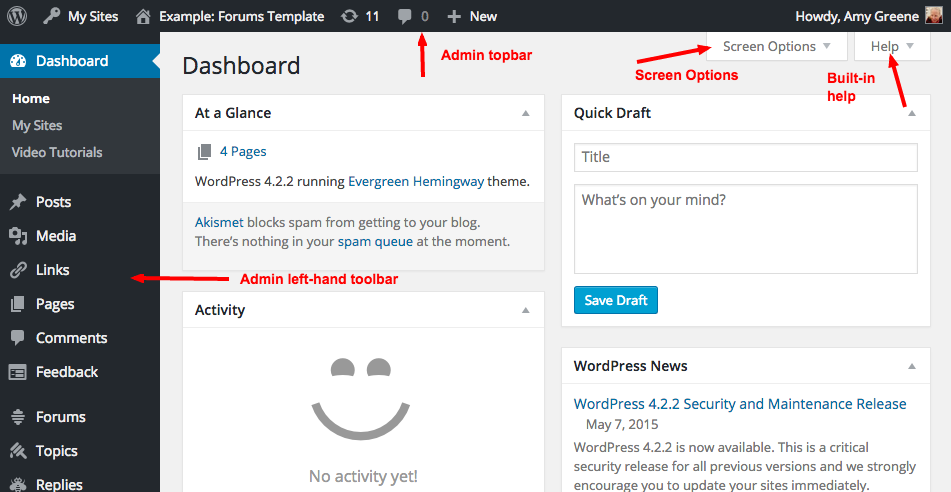
The admin top bar
- Use the Home icon to go between the Dashboard to edit your site and Visit Site to see how the site looks to visitors
- The admin left-hand toolbar
- From the Dashboard, the left-hand navigation menu provides links to all of the WordPress administration screens, with submenu items displayed on hover.
Built-in Help
Contextual help is always available from the upper right Help tab in your Dashboard. This is likely the fastest way to get your questions answered.
Screen Options
- Use the Screen Options tab to choose which Dashboard boxes to show.
Editing a page
- Navigate to the page you want to update
- Click the Edit Page link in the admin topbar
- Make your changes and click Update to save
Adding a new page
- From the Pages left-hand menu choose Add New
- Enter the page title (directly under Edit Page)
- Click Update to save your changes
Navigation and new pages
- All top-level new pages added to your site should automatically appear in your primary navigation. For more see Navigation and Custom Menus.
Inserting Media and Other Content
Adding media to a page
- You can upload and insert media (images, audio, documents, etc.) by clicking the Add Media button when editing a page.
- You can select from the images and files already uploaded to the Media Library, or upload new media to add to your page or post.
- To create an image gallery, select the images to add and click the “Create a new gallery” button.
Embedding media from other sites
- You can also embed media from many popular websites including Twitter, YouTube, Vimeo, Flickr and others by pasting the media URL on its own line into the content of your post/page.
Customizing your site's navigation
- To change your site’s primary navigation go to Appearance > Menus
- Each custom menu may contain a mix of links to pages, categories, custom URLs or other content types. Menu links are added by selecting items from the expanding boxes in the left-hand column below.
- To reorganize menu items, drag, and drop items with your mouse or use your keyboard. Drag or move a menu item a little to the right to make it a submenu
- You can assign theme locations to individual menus by selecting the desired settings at the bottom of the menu editor. You typically will choose Primary Menu for the main menu.
Modify what elements appear in your “Widgets”
- Widgets are independent sections of content that can be placed into any widget capable area provided by your theme (commonly called sidebars).
- Widgets are controlled via Appearance > Widgets
- To populate your sidebars/widget areas with individual widgets, drag and drop the title bars into the desired area
- The Links widget content (also seen as the Bookmarks sidebar) can be edited using Dashboard > Links
Changing the Site Header
Site title and subtitle
- To change the title and subtitle of your site as it is displayed in the header
- From the dashboard go to Settings > General
- Change the site title and/or tagline (subtitle)
- Click Save Changes at the bottom of the page
Changing the header image
- Your site is using a theme that has been customized for Evergreen. You can, however, add your own header image that better reflects the topic you are teaching. To change the header image:
- Navigate to Appearance > Header and note the native image dimensions required for your theme. Most important is to note width.
- Download/create an image that is equal to or greater than the recommended width for your theme’s header image. Note: if you use a smaller image it will be enlarged and will look blurry. Don’t worry about getting it exact as there is a built-in cropping tool will adjust your image to the proper dimensions.
- click on Customize in the admin bar across top
- then in the pop-out menu at left, click on Header Image
- click on the image to select it and set it as the header
- click on the blue Publish button (should then change to "Published")
- then click on the "x" in upper left corner to close the menu and return to the site
Site Visibility and Protection
Who Has Access to Your Site?
- With WordPress, you have several options for controlling who can see your site or portions of your site.
Site Visibility
- Settings are located in Settings > Reading. Options include:
- Publicly viewable and indexed by search engines
- Publicly viewable but requesting search engines to not index your site
- Requires a login (must be an Evergreen community member)
- Requires a login and must be a subscriber of the site (this is the option we use to limit access to enrolled students only)
- Only admins of the site
Making your site visible
- New sites by default are set to not be publicly viewable with the idea that faculty must time to work on the site before it becomes public.
- To change your site’s visibility got to Settings > Reading
- Either of the top two options will open the site to visitors. Other options require an Evergreen login and varying levels of access to the site.
Enrollment
- At the beginning of the quarter, enrolled students will be added as subscribers to the site
- Additionally, faculty can add/remove users via Users > Add New
Users and Roles
- Users added to your site can be assigned a variety of roles with different abilities.
- Subscribers can view content but cannot create regular site content. This is the default role students are assigned when added to your course.
- Contributors can write and manage their posts but not publish posts or upload media files.
- Authors can publish and manage their own posts, and are able to upload files.
- Editors can publish posts, manage posts as well as manage other people’s posts, etc.
- Administrators have access to all the administration features.
Protected Files and Pages/Posts
- Even if your site is set to be publicly viewable you can require a login to access materials designated as Protected.
File protection
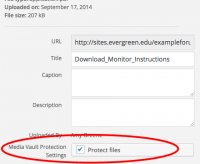
- Faculty can limit access to enrolled students for uploaded media files that must copyrighted protection.
- Once a file has been uploaded to the Media Library you can edit items that should be protected by clicking Add to Protected under the Media Vault Protection Settings.
- Choose "Use Default Setting" for file access permission (which is set to subscribers).
- See Protected Files for more info and troubleshooting tips.
Page/post privacy
- Choose which portions of your site are public and which are only viewable to your students.
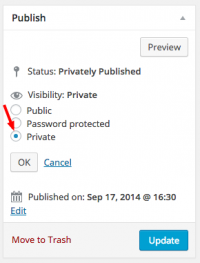
- By setting a page’s visibility to "Private" (in the Publish block) it will only be viewable to logged in users who are subscribers to the site (your students).
- Note: you should still use file protection for media that needs protection even if it is only linked from a private page.
Additional Features
Email enrolled students from within WordPress
- Using the Email Users plugin to contact all registered students in your program
Discussion Forums
- Protected Discussion Forums
Evaluation Conference Sign-up Sheets
- Using the Eval Conference Sign-up Sheet plugin to create a page where students can easily sign-up for a conference time slot.


