Microsoft Education and Team Meetings in Canvas
Before you get started, make sure you have a Canvas course created for your offering.
Get Started with Team Meetings
Meetings scheduled through the Microsoft Education Meetings app are associated with your Canvas course and are listed only within that course. Invited attendees will see these meetings on their Outlook and Teams calendars as well as being able to navigate to the meeting via Canvas. They can participate via the Teams web app (no software installation is required) or call into a meeting via phone.
Configure the Microsoft Education Integration

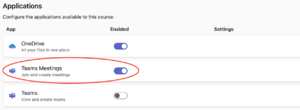
NEW: Enable and configure the Microsoft Education Integration in Canvas
- Add the Microsoft Education to your course navigation
- Configure and enable Teams Meetings
- Once the Teams Meetings feature is enabled in the Microsoft Education setup, you will now be able to schedule a meeting with your class.

To Schedule a New Teams Meeting
- Launch the Microsoft Education tool from your course nav and select the Teams Meetings tile in the dashboard to launch the Meetings app.
- Click the New Meeting button in the upper right.
- Enter the required meeting information, such as name, description, and start/end dates and times.
- The 'Allow anyone in the course to join' checkbox pins the meeting in the course for access by anyone in the course.

Add a Link to the Teams Meeting
- After creating the Teams meeting and make a note of the date, time, and meeting link.
- Add it to your home page or Canvas calendar.
To Add the Meeting link to your Canvas Course Calendar>
- In your Canvas course, go to Settings and select Course Calendar from the right menu.
- If you are teaching more than one course, ensure that the proper course is selected within the calendar.
- Select the + and then select Event to create a new event.
- Give it the title, date, time, and link from your Teams Meeting.
- Select Submit.
Start or Join the Meeting
Both Faculty and Students can join the Teams Meeting by:
- Selecting Microsoft Education from the Canvas Course navigation
- Click Teams Meetings
- Choose Join to start or join the scheduled meeting.
- Choose to launch the meeting in the Teams App (if you have this installed) or Continue on this browser
Record the meeting
Once the meeting has started:
- click the three breadcrumb dots at the top of the call window and select Record and Transcribe > Start recording.
- To stop recording, either end the call or go back to the three breadcrumb dots from the record menu and select stop recording.
See also: Microsoft's Record a Meeting documentation.
Meeting Recordings
Meeting recordings will only be available for 60 days. You will need to manually move this recording to Panopto if you wish to keep recordings available to students.
Using Breakout Rooms
Important note: Faculty will need to be using the desktop Teams app (not the web app) to be able to setup Breakout Rooms during the meeting. Learn more: Manage breakout rooms in Microsoft Teams
Related Articles
- Microsoft Team Meetings
- Microsoft Education Integration in Canvas
- Upload Teams Meeting Recording to Panopto
Teams Help
- Getting Started with Teams
- Teams and Canvas - Faculty
- Group Chat
- Channel Types in Teams
- Chat vs Channel Posts
- Video Calls and Meetings
- Moving Files
- Requesting a Microsoft Team
- Teams Phone Getting Started
Microsoft 365 Help
- Microsoft 365 Help
- Email Help
- Microsoft Teams
- Teams Phone
- Copilot
- Microsoft OneDrive
- Microsoft Bookings
- Microsoft Project
- Microsoft Lists
- Microsoft Forms
Get Help
Submit a technology support request
No account or having problems logging in?
Request help as a guest