Microsoft Education and Teams Classes in Canvas
Before you get started, make sure you have a Canvas course created for your offering.
Get Started with Teams Classes
Enable the Teams Sync in Canvas
Teams Sync will automatically create a Team, add faculty and students, and stay synchronized with your Canvas course enrollment.
- Navigate to your Canvas course.
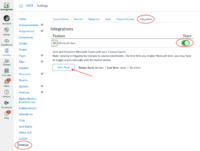
- From your Canvas course, left-hand navigation menu go to Settings
- From the top menu tabs choose Integrations
- Expand the Microsoft Sync option and enable it under the State toggle.
- The first time you enable Sync you will need to trigger it manually.
- Click the Sync Now button.
- This will initiate the creation of your Class Team which may take up to an hour to complete.
Configure the Microsoft Education Integration
NEW: Enable and configure the Microsoft Education Integration in Canvas
- Add the Microsoft Education to your course navigation
- Configure and enable Teams
- Once the Teams feature is enabled in the Microsoft Education setup, a Class Team will be automatically created with the same name as your Canvas course.
Prepare your Team
Once your Team has been created, students will not have access until you "Activate" the Team. This gives you the opportunity to prepare the Team prior to student access.
- Launch the Teams app (either via the desktop app or via a web browser at 365.cloud.microsoft)
- The Activity Feed will alert you when your Team has been generated.
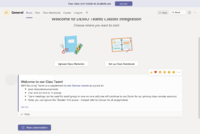
- Create a welcome post on the General channel. Consider including the following:
- Clarify with your students how Teams will be used in your offering. What content/activities will reside in Canvas and what content/activities Teams will be used for.
- Add a link back to your Canvas course.
Example Welcome Post
Welcome to our Class Team!
We'll be using Teams as a supplement to our Canvas course <link to your Canvas home page> as a place to:
- post news/announcements
- chat one-on-one or in groups
- Team meetings can be used for small group or one-on-one calls (we will continue to use Zoom for our primary class remote sessions)
- Note: you can ignore the "Grades" link above - instead refer to Canvas for all assignments
Activate your Team
Once you are ready for students to have access to your Team:
- Navigate to your Team.
- Click the Activate button at the top.
Once the Team has been activated, students enrolled in your Canvas course will automatically be added as members of the Team. The Team roster will auto-sync whenever changes occur in your Canvas enrollment.
Class Team Default Permissions
As the Team owner, you can manage what students (members) are allowed to do within the Team. To access these settings:
- click the 3 dots next to your Team's name and choose Manage Team.
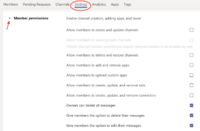
- Select Settings from the top navigation.
- Expand Member permissions - By default:
- Team owners (faculty) can delete all messages.
- Members (students) can delete and edit their messages.
Using Teams and Canvas Together
Key Benefits
Microsoft Teams integrates directly with Canvas and offers several advantages for course management:
- Simplified file management – Share documents more easily than through OneDrive
- Enhanced collaboration – Create channels for student groups or private channels for co-teaching partnerships
- Secure communication – Chat individually or in groups; the mobile app eliminates the need to share personal phone numbers
- Official platform – M365 is the college's supported platform, providing better data security than third-party tools like Slack or Google
Communication
Use Teams to build your online classroom community:
- Posts – Share news and announcements with your entire class
- Chat – Connect students with you and each other in a secure, college-supported environment
- Mobile access – Encourage students to download the Teams mobile app for easy communication
Collaboration and File Sharing
Team Files vs. OneDrive: When you upload files to your Team, they're stored in a shared SharePoint library accessible to all class members. This is simpler than the Office 365 Canvas integration, which connects to your personal OneDrive.
Organizing with Channels:
- Create topic-based or workgroup channels to organize files and facilitate collaboration
- Add up to 20 private channels with restricted membership when necessary
- Note: Private channels have limitations—use them sparingly and only when truly needed


