Difference between revisions of "WordPress Tutorial for sites.evergreen.edu"
From Help Wiki
(Tag: VisualEditor) |
|||
| (2 intermediate revisions by 2 users not shown) | |||
| Line 51: | Line 51: | ||
#Navigate to the page you want to update | #Navigate to the page you want to update | ||
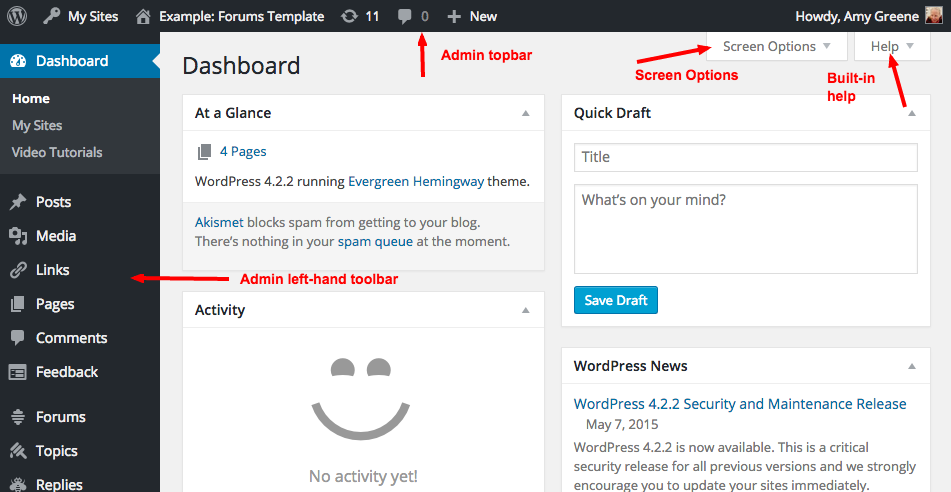
#Click the Edit Page link in the admin topbar | #Click the Edit Page link in the admin topbar | ||
| − | #Make your changes and click | + | #Make your changes and click Publish to save |
'''Adding a new page''' | '''Adding a new page''' | ||
#From the Pages left-hand menu choose Add New | #From the Pages left-hand menu choose Add New | ||
| Line 57: | Line 57: | ||
#Click Update to save your changes | #Click Update to save your changes | ||
'''Navigation and new pages''' | '''Navigation and new pages''' | ||
| − | *All top-level new pages added to your site should automatically appear in your primary navigation. For more see Navigation and Custom Menus. | + | *All top-level new pages added to your site should automatically appear in your primary navigation. For more see [[Navigation_Menus|Navigation and Custom Menus.]] |
}} | }} | ||
{{Collapsed2|Inserting Media and Other Content| | {{Collapsed2|Inserting Media and Other Content| | ||
| Line 91: | Line 91: | ||
# Navigate to Appearance > Header and note the native image dimensions required for your theme. Most important is to note width. | # Navigate to Appearance > Header and note the native image dimensions required for your theme. Most important is to note width. | ||
# Download/create an image that is equal to or greater than the recommended width for your theme’s header image. Note: if you use a smaller image it will be enlarged and will look blurry. Don’t worry about getting it exact as there is a built-in cropping tool will adjust your image to the proper dimensions. | # Download/create an image that is equal to or greater than the recommended width for your theme’s header image. Note: if you use a smaller image it will be enlarged and will look blurry. Don’t worry about getting it exact as there is a built-in cropping tool will adjust your image to the proper dimensions. | ||
| − | + | # Upload the image and set it as the header image: | |
| − | * click on Customize in the admin bar across top | + | *click on Customize in the admin bar across top |
| − | * then in the pop-out menu at left, click on Header Image | + | *then in the pop-out menu at left, click on Header Image |
| − | * click on the image to select it and set it as the header | + | *click on the image to select it and set it as the header |
| − | * click on the blue Publish button (should then change to "Published") | + | *click on the blue Publish button (should then change to "Published") |
| − | * then click on the "x" in upper left corner to close the menu and return to the site | + | *then click on the "x" in upper left corner to close the menu and return to the site |
| + | }} | ||
{{Collapsed2|Site Visibility and Protection| | {{Collapsed2|Site Visibility and Protection| | ||
'''Who Has Access to Your Site?''' | '''Who Has Access to Your Site?''' | ||
Revision as of 14:58, 2 October 2018
Everything you need to know to get started using WordPress at sites.evergreen.edu.
WordPress Overview
Inserting Media and Other Content
Changing the Site Header
Site Visibility and Protection


Additional Features

WordPress Help
Still have WordPress questions?
- Create a Help Ticket or call the Computer Center at 360-867-6227
- WordPress FAQ - common questions
- WordPress Tutorial - step by step introduction